Summary
This article provides all users of the system with a roadmap to deliver services using all aspects of the Fountayn Platform.
Table of Contents
- 1-0 Enterprise Transfer Setup
- 2-0 Initiate New Trial
- 3-0 Design
- 4-0 Test
- 5-0 Approve
- 6-0 Production Deployment
- 6-5-0 Configure Randomization
- 6-6-0 Configure Drug Inventory
- 7-0 Data Capture and Management
- 8-0 Trial Close
- 9-0 User Administration
- 10-0 Support
General Information
Process ID
Clinical Process Manual
Process Purpose
The Clinical Process Manual provides all users of the system with a roadmap to deliver services using all aspects of the Fountayn Platform.
Flow Diagram

Interface Description
Entrance Criteria
The only entrance criterion for the Clinical Process is the desire to implement a clinical trial using the Fountayn Platform. The Clinical Process Manual is the highest level document in the process.
Inputs
The inputs are not applicable because this is the highest level document in the process.
Outputs
A clinical trial that is completed and archived so that it can be submitted to a regulatory authority.
Exit Criteria
A valid submission document that is accessible to the Sponsor.
Procedural Description
Responsibilities
The management of the Vendor decides to use Fountayn software to deliver trials. The Vendor’s management decides what portions of the process to execute or outsource.
1-0 Enterprise Transfer Setup
The Enterprise Transfer Setup activities have to be performed after the contract is completed. Once the Enterprise Transfer Setup activities are completed the Vendor may begin daily operational work.
2-0 Initiate New Trial
The Initiate New Trial process is used to register the trial within the Fountayn system.
3-0 Design
This Design process represents the actual development that must occur before the trial can be deployed for data collection.
4-0 Test
The Test process is used to ensure the study functions according to the known specifications.
5-0 Approve
The Approve process is the final step that must occur prior to the study being deployed into Production for the customer.
6-0 Production Deployment
The Production Deployment process defines the necessary steps for moving a study into Production.
7-0 Data Capture and Management
The Data Capture and Management process defines the necessary steps needed to obtain and produce clean data.
8-0 Trial Close
The Trial Close process outlines the steps to be executed after the trial is completed.
9-0 User Administration
The User Administration process defines the steps for routing a user access request.
10-0 Support
The Support process defines the steps for providing support to users.
1-0 Enterprise Transfer Setup
General Information
Process ID
1-0
Process Purpose
The Enterprise Transfer Setup instructs Fountayn and its Clients on the process for creating a Trial Manager tool.
Flow Diagram

Interface Description
Entrance Criteria
A Client must have a signed ET Contract (or Master Services Agreement) in order to create a Trial Manager tool.
Inputs
Signed Contract
Outputs
Client Trial Manager Tool
Exit Criteria
A Client Trial Manager tool has been setup, and the Vendor is now able to initiate new trials.
Procedural Description
Responsibilities
Fountayn must setup the Client Trial Manager tool and place it in the correct place in the Data Pyramid. If the client is an existing Fountayn client, then it must decide if Fountayn will continue to manage its existing trials or if the client will function autonomously.
1-1 Does Trial Manager Tool Exist?
The first step is to determine if a Trial Manager tool already exists. If the Client is an existing Fountayn client, a client-specific Trial Manager will already exist and be tied into the “Trial Manager (Internal Clients)” Data Pyramid. If a Trial Manager Tool exists, proceed to 1-5 Will Fountayn Manage Existing Trials?. If a Trial Manager tool does not exist, proceed to 1-2-0 Create Trial Manager Workgroup.
1-2-0 Create Trial Manager Workgroup
When creating a new Trial Manager tool, it must first have a workgroup with which it is associated. The workgroup is usually named the client name. For example, if the client is ABC Pharmaceuticals Inc., the workgroup name would be “ABC Pharma”.
1-3-0 Create Trial Manager Tool
Once the workgroup has been created, it must be located in the ManagementServlet application. From the Manage Entities screen, access the record for the workgroup and assign a DataCollector Tool of type “Trial Manager”. The tool should be named “Trial Manager (Client Name)”. The appropriate roles must then be assigned to the tool.
1-4-0 Create Enterprise Manager Tool
Once the workgroup has been created, it must be located in the ManagementServlet application. From the Manage Entities screen, access the record for the workgroup and assign a DataCollector Tool of type “Trial Manager”. The tool should be named “Trial Manager (Client Name)”. The appropriate roles must then be assigned to the tool.
1-5 Will Fountayn Manage Existing Trials?
If a Trial Manager already exists, then Fountayn has been managing trials for the client. We can make the assumption that the client was a “Trial-by-Trial” client and is now moving to Enterprise Transfer. The Client must decide if Fountayn will continue to manage the existing trials or if the client will now manage all of their trials. If the Client wishes for Fountayn to continue managing their existing trials, then a new Trial Manager will be created for the trials running under the Enterprise Transfer Agreement (proceed to 1-2-0 Create Trial Manager Workgroup). If the Client decides to manage all of their trials, then their current Trial Manager will be moved within the Data Pyramid (proceed to 1-6-0 Modify Data Pyramid).
1-6-0 Modify Data Pyramid
“Trial-by-Trial” clients are managed under the “Trial Manager (Internal Clients)” portion of the Data Pyramid. The Client’s Trial Manager tool will need to be moved to the “Trial Manager (Enterprise Transfer Clients)” portion of the Data Pyramid.
1-2-0 Create Trial Manager Workgroup
General Information
Process ID
1-2-0
Process Purpose
This process outlines the steps for creating a Trial Manager workgroup.
Flow Diagram

Interface Description
Entrance Criteria
A Client must have a signed ET Contract (or Master Services Agreement) in order to create a Trial Manager tool.
Inputs
Signed Contract
Outputs
Client Trial Manager Workgroup
Exit Criteria
A Client Trial Manager workgroup is displayed in Enterprise Manager.
Procedural Description
Responsibilities
Fountayn must setup the Client Trial Manager workgroup.
1-2-1 Access Enterprise Manager
Only those Fountayn employees that have administrative access to the Medical Research node of the Fountayn Enterprise Manager can create a new workgroup within the enterprise. To access the Fountayn Enterprise Manager, the employee must first login to https://secure.fountayn.com and then access the Fountayn Enterprise tool.
1-2-2 Navigate to Medical Research Node
Once in the Enterprise Manager, navigate within the tree structure to the Medical Research node. Dependent upon your access entry point within the tree, the path may include Fountayn Office > Services > Medical Research.
1-2-3 Create New Workgroup
Right click on the “medicalResearch” link to launch the menu. Click on the “Create New Workgroup” link to display the Create Workgroup screen. Complete the required information and click the Save button. The workgroup will be created and added to the tree in alphabetical order.
1-3-0 Create Trial Manager Tool
General Information
Process ID
1-3-0
Process Purpose
This process outlines the steps for creating a Trial Manager tool.
Flow Diagram

Interface Description
Entrance Criteria
A Client must have a signed ET Contract (or Master Services Agreement) in order to create a Trial Manager tool.
Inputs
Trial Manager Workgroup
Outputs
Client Trial Manager Tool
Exit Criteria
A Client Trial Manager tool is displayed in the Data Pyramid.
Procedural Description
Responsibilities
Fountayn must setup the Client Trial Manager tool.
1-3-1 Access ManagementServlet
Only those Fountayn employees that have access to ManagementServlet can create a Trial Manager tool. To access ManagementServlet, the employee must first login to https://secure.fountayn.com and then access ManagementServlet.
1-3-2 Access Trial Manager Workgroup
Once in ManagementServlet, the Trial Manager workgroup must be located by performing an Organization entity search for the workgroup name. Click on the name of the appropriate workgroup to display the workgroup’s tools.
1-3-3 Assign DataCollector Tool
Click the Assign DataCollector Tool link to create the Trial Manager tool. Complete the Name, Application (Trial Manager) and Description fields to create the tool. Please note that the Name should follow the convention “Trial Manager (Client Name)”.
1-3-4 Assign Roles
After the tool has been created, the roles can be assigned. Click the ASSIGN link, located in the Roles column, for the corresponding Trial Manager tool and add the appropriate roles by clicking the corresponding check boxes and utilizing the multi-action assign function. Default roles for the Trial Manager tool are Configurator, Auditor, Project Manager, Trial Designer, FTYN Debug, Java Developer, Tester and QA.
1-3-5 Add to Data Pyramid
All trials that are managed by Fountayn appear in the “Trial Manager (Internal Clients)” portion of the Data Pyramid. This pyramid is built using the tool ids, the technical representation of tools, for the corresponding Trial Managers.
To add the new Trial Manager tool to the Data Pyramid, access the MedicalResearch workgroup as defined in Step 1-3-2 and then click on the ASSIGN link in the Children column for the Trial Manager (Internal Clients) tool. Type in the Tool ID and save the form. The new Trial Manager tool will now be included in the Data Pyramid.
1-4-0 Create Enterprise Manager Tool
General Information
Process ID
1-4-0
Process Purpose
This process outlines the steps for creating an Enterprise Manager tool.
Flow Diagram

Interface Description
Entrance Criteria
A Client must have a signed ET Contract (or Master Services Agreement) in order to create a Trial Manager tool.
Inputs
Trial Manager Workgroup
Outputs
Client Enterprise Manager Tool
Exit Criteria
A Client Enterprise Manager tool is displayed in the Fountayn Enterprise Manager.
Procedural Description
Responsibilities
Fountayn must setup the Client Enterprise Manager tool.
1-4-1 Access ManagementServlet
Only those Fountayn employees that have access to ManagementServlet can create an Enterprise Manager tool. To access ManagementServlet, the employee must first login to https://secure.fountayn.com and then access ManagementServlet.
1-4-2 Access Trial Manager Workgroup
Once in ManagementServlet, the Trial Manager workgroup must be located by performing an Organization entity search for the workgroup name. Click on the name of the appropriate workgroup to display the workgroup’s tools.
1-4-3 Assign Custom Tool
Click the Assign Custom Tool link to create the Enterprise Manager tool. Select Enterprise Manager from the Type drop down list and complete the Name and Description fields to create the tool. Please note that the Name should follow the convention “Client Name Enterprise” and that the roles are automatically assigned with the creation of the tool.
1-6-0 Modify Data Pyramid
General Information
Process ID
1-6-0
Process Purpose
This process outlines the steps for modifying the Data Pyramid in order to move existing Trial Manager tools within the pyramid.
Flow Diagram

Interface Description
Entrance Criteria
A Client must have signed an ET contract (or Master Services Agreement) and made the decision to manage all existing and new trials.
Inputs
Existing Trial Manager Tool
Outputs
Client Trial Manager Tool
Exit Criteria
A Client Trial Manager tool is correctly positioned within the Data Pyramid.
Procedural Description
Responsibilities
Fountayn must move the Client Trial Manager tool to the correct position within the Data Pyramid.
1-6-1 Access ManagementServlet
Only those Fountayn employees that have access to ManagementServlet can modify the Data Pyramid. To access ManagementServlet, the employee must first login to https://secure.fountayn.com and then access ManagementServlet.
1-6-2 Access Medical Research Workgroup
Once in ManagementServlet, the Medical Research workgroup must be located by performing an Organization entity search for the workgroup name (medicalResearch). Click on the name of the appropriate workgroup to display the workgroup’s tools.
1-6-3 Access Trial Manager (Internal Clients) Tool
Click on the VIEW link in the Children column for the Trial Manager (Internal Clients). A list of all of the tool’s children will be displayed.
1-6-4 Remove Existing Trial Manager Tool as Child
When viewing a list of the Trial Manager (Internal Clients) tool’s children, locate the appropriate Client Trial Manager and click the corresponding red ‘x’ in the Remove column. The tool will be removed from the Data Pyramid.
1-6-5 Access Trial Manager (Enterprise Transfer Clients) Tool
All trials that are not managed by Fountayn appear in the “Trial Manager (Enterprise Transfer Clients)” portion of the Data Pyramid. This pyramid is built using the tool ids, the technical representation of tools, for the corresponding Trial Managers. Click on the ASSIGN link in the Children column for the Trial Manager (Enterprise Transfer Clients) to display the Assign Children screen.
1-6-6 Assign Existing Trial Manager Tool as Child
From the Assign Children screen, complete the Tool ID information to add the Client Trial Manager tool to the Data Pyramid. The new Trial Manager tool will now be included in the Enterprise Transfer portion of the Data Pyramid. Click on the VIEW link in the Children column for the Trial Manager (Enterprise Transfer Clients) to view the assignment.
2-0 Initiate New Trial
General Information
Process ID
2-0
Process Purpose
New trials are initiated through the Trial Manager tool. The below steps describe the process for setting up a new trial.
Flow Diagram

Interface Description
Entrance Criteria
A Client must have a signed ET Contract (or Master Services Agreement) and Trial Manager tool in order to initiate a new trial.
Inputs
Signed Contract, Trial Manager tool
Outputs
Trial record within Trial Manager
Exit Criteria
A new trial has been setup within the Trial Manager tool.
Procedural Description
Responsibilities
The Vendor must setup a new trial within the appropriate Trial Manager tool.
2-1 Enroll a New Trial
In order to initiate a new trial, a new record must be enrolled in the Trial Manager tool. Please see the Enrolling a Trial section in the Trial Manager Manual for more information.
2-2 Enter Management Data
Management Data is used for metrics reporting by tracking study therapeutic areas, phases and milestones. Please see the Entering Project Parameters section in the Trial Manager Manual for more information.
2-3 Create Role Sets
Roles sets are the grouping of roles that are created during the design phase of the clinical trial. These sets are defined once within the application and then assigned across all clusters (Design, Test, Approve and Production). Please see the Defining Role Sets section in the Trial Manager Manual for more information.
2-4 Set up Tools
Setting up tools provides the mechanism for creating and managing the Data Pyramid within a study. In this instance, tools represent sites. The sites are created for testing, training and production use (clinical site access to data). The tools must be set up on each cluster (Design, Test, Approve and Production). Please see the All Sites – Managing the Site Network section in the Trial Manager Manual for more information.
3-0 Design
General Information
Process ID
3-0
Process Purpose
This process outlines the steps for developing a trial in the Fountayn Platform.
Flow Diagram

Interface Description
Entrance Criteria
A Trial record exists in the Trial Manager, and source documents have been received
Inputs
Source Documents
Outputs
Working version of the trial available in Trial Manager
Exit Criteria
Development has been completed for all non-outstanding components of the trial
Procedural Description
Responsibilities
The Trial Designer(s) and Project Manager will communicate with the client to determine the requirements for the trial. The Trial Designer(s) and if necessary, Developers, will implement these requirements while taking feedback from the Client if the Client wishes to give any.
3-1 Review Source Documents
The Trial Designer(s) and Project Manager will review the source documentation provided by the client. This may be in the form of paper CRFs, study protocol, and/or previous similar studies. They will note any potential problem areas or blocks to the design of the study in eClinical.
3-2 Define Requirements
The Trial Designer(s) and Project Manager will meet with the Client to define a list of requirements. These requirements can be the specifications for components that the client needs, such as Randomization or Imports, or a specific way they would like the form structure and dependencies designed. The list of requirements should be negotiated, as many clients are not fully aware of what functions the eClinical system is and is not capable of.
3-3-0 Develop Basic Requirements
The Trial Designer(s) will develop the basic “shell” of the trial, which includes the form structure and most data points. Typically roles can be configured and most dependencies can be written at this stage.
3-4 Share Draft with Client (optional)
Many clients like to review their trials as development progresses. In some cases they are not fully certain of the trial’s requirements, and they may wish to add or remove certain features. If they are not very familiar with the Fountayn Platform, they may discover certain things that they like or do not like about the system and want their trial to incorporate those feelings. Designing a trial in Fountayn is almost always an iterative process taking input from all parties involved.
3-5 Redefine Requirements (optional)
If the client requests any alterations to the requirements as they were initially defined, these should be recorded so that development proceeds smoothly. It is usually up to the discretion of the Project Manager if a change in a requirement requires a modification to the original contract. In addition, during step 3-3-0 Develop Basic Requirements, you may discover that a requirement needs updating as it was not feasible or correct in the original listing.
3-6-0 Develop Advanced Requirements
Now that the basic study shell is created and the trial requirements are more firmly defined, work should begin on advanced features for the trial. This process is very similar to development of the basic requirements.
3-7 Review Study Against Requirements
After the components of the trial have been developed, the Trial Designer(s) and Project Manager should review those against the requirements defined in step 3-2 and redefined in step 3-5 (if applicable).
3-8 Any Adjustments Needed?
The Trial Designer(s) and Project Manager should determine if any components do not meet their requirements.
3-9 Redevelop Requirements
If any components do not meet their requirements, those components should be updated until they are satisfactory. This may take several iterations of review and development depending on the complexity of the components involved.
3-3-0 Develop Basic Requirements
General Information
Process ID
3-3-0
Process Purpose
This process outlines the steps for developing the basic components of an eClinical trial.
Flow Diagram

Interface Description
Entrance Criteria
Trial requirements have been defined
Inputs
Trial requirements
Outputs
Basic working version of the study, containing data points and minimal dependencies
Exit Criteria
Development of basic requirements complete
Procedural Description
Responsibilities
The Trial Designer takes the agreed upon requirements and develops the basic “shell” of the study, i.e. the form structure and data points, as well as basic configuration necessary for the application. If necessary, the Trial Designer also develops the dependencies.
3-3-1 Create Casebook Shell
The Trial Designer creates the forms needed for the study based on the requirements agreed upon earlier. The forms should match the structure found in the source document(s), taking into consideration any changes from the source as noted by the client. Help on creating forms can be found in the FormTypes Definition and Forms Template sections of the DataArchitect Manual.
3-3-2 Create Data Points
After the forms are in place, questions can be added. These questions should come from the source document(s) and any specific requirements as agreed upon with the client. Help on creating data points can be found in the Question Types, Question Layout, and Display sections of the DataArchitect manual.
3-3-3 Configure Basic Parameters
Each eClinical application must have several basic options configured, such as date format, study start date, patient primary and secondary identifiers, and more. These should be developed as accurately as possible from the source document(s) and requirements, however some placeholder values may be necessary at this point in the trial’s development. Help on basic parameters can be found in the Application Setup and App Properties sections of the DataArchitect manual.
3-3-4 Configure Roles and Permissions
No study will be functional without a basic set of roles available to the users. Most widely used clinical roles, such as Coordinator, Investigator, Monitor, and Data Manager all have a “standard” set of permissions that can be assigned if those requirements have not been determined yet by the client. Help on roles and permissions can be found in the Roles section of the DataArchitect manual.
3-3-5 Share Draft With Client
Many clients like to review their trials as development progresses. In some cases they are not fully certain of the trial’s requirements, and they may wish to add or remove certain features. If they are not very familiar with the Fountayn Platform, they may discover certain things that they like or do not like about the system and want their trial to incorporate those feelings. Designing a trial in Fountayn is almost always an iterative process taking input from all parties involved.
3-3-6 Any Corrections Needed?
The Trial Designer should note if they find any basic requirements that need to be corrected, or were missing entirely.
3-3-7 Make Corrections
If any corrections were needed, those should be performed at this time.
3-3-8 Create Standard Dependencies (Edit Checks)
Most questions have standard dependencies that are almost always applicable. For instance, most questions cannot be blank, if “other” is selected for a question then it must be specified, inclusion criteria have to be answered yes, etc. These dependencies can be created even if no requirement is explicitly stated for them. Help on dependencies can be found in the Dependencies section of the DataArchitect manual, as well as in the Dependencies Guide.
3-3-9 Create Application Specific Dependencies (Edit Checks)
If the client has specified any dependencies that are specific to their study, these can be developed as well.
3-3-10 Review Work
After the basic requirements have been developed (note that steps 3-3-3 through 3-3-6 can be completed in parallel), the Trial Designer should review their work for completeness and basic mistakes. This does not substitute for validation of the study by a testing team, however it does serve to maintain a high quality for eClinical trials.
3-3-11 Any Corrections Needed?
The Trial Designer should note if they find any basic requirements that need to be corrected, or were missing entirely.
3-3-12 Make Corrections
If any corrections were needed, those should be performed at this time.
3-3-13 Unable to Implement any Requirements?
Some times what was thought to be a basic requirement will turn out to be more complicated than anticipated, such as an exotic form structure or unusually complicated dependency. The Trial Designer should note all basic requirements they were unable to implement.
3-3-14 Record Unmet Requirements for Advanced Work
If the Trial Designer was unable to implement any of the basic requirements, those should be recorded and developed during step 3-6-0 Develop Advance Requirements. The client should be made aware of any such requirements.
3-6-0 Develop Advanced Requirements
General Information
Process ID
3-6-0
Process Purpose
This process outlines the steps for developing the advanced components of an eClinical trial.
Interface Description
Entrance Criteria
Basic requirements have been developed and requirements redefined, if necessary
Inputs
Basic study “shell” with data points and dependencies
Outputs
Full working version of the study
Exit Criteria
Development of all non-outstanding requirements completed
Procedural Description
Responsibilities
The Trial Designer develops the remaining requirements that were not implemented in step 3-3-0 Develop Basic Requirements. If necessary, the Trial Designer will request custom work to be completed by a Developer. Note that not all of the components listed in items 3-6-3-0 through 3-6-10 may be implemented, only those required by the client.
3-6-1 Were any Basic Requirements Redefined?
Many times clients will need to make minor adjustments to the basic design of their trial. Those adjustments should have been noted in steps 3-4 Share Draft witih Client and 3-5 Redefine Requirements. If no updates were needed, then step 3-6-2 Update Basic Requirements can be omitted.
3-6-2 Update Basic Requirements
Before starting work on the trial’s advanced requirements, any necessary updates to the form structure should be made. The reason for this is that many advanced requirements, in particular imports and exports, depend on the form structure and layout of questions in the study. If those advanced requirements are developed prematurely, then they will have to be modified whenever the form structure changes, resulting in a longer overall development time.
3-6-3-0 Design Randomization / Drug Inventory
If necessary, Randomization and/or Drug Inventory should be configured.
3-6-4 Design Imports
Information about configuring Imports can be found in the Imports section of the DataArchitect Manual.
3-6-5 Design Exports
Information about configuring Exports can be found in the Exports section of the DataArchitect Manual.
3-6-6 Design Coding
Information about configuring Coding can be found in the Codes section of the DataArchitect Manual.
3-6-7 Design Reports
Information about configuring Reports can be found in the Reports section of the DataArchitect Manual, as well as the Patient Management and Visit Schedule guides.
3-6-8 Design Scripts
Information about configuring Scripts can be found in the Scripts section of the DataArchitect Manual, as well as the Scripts Guide.
3-6-9 Design Custom Components
Requirements that cannot be implemented through standard functions in DataArchitect may require custom development work. This work is requested by the Project Manager, completed by a Developer, and in most cases implemented by the Trial Designer.
3-6-10 Design Other Components
Any requirements not listed in the previous steps should be developed as well, including custom checklists and workviews, assignments, branching, and any other feature. Information on these components can be found in the DataArchitect Manual and the Trial Design section under Guides.
3-6-11 Review Work
After the basic requirements have been developed (note that steps 3-6-3-0 through 3-6-10 can be completed in parallel), the Trial Designer should review their work for completeness and basic mistakes. This does not substitute for validation of the study by a testing team, however it does serve to maintain a high quality for eClinical trials.
3-6-12 Any Corrections Needed?
The Trial Designer should note if they find any requirements that need to be corrected, or were missing entirely.
3-6-13 Make Corrections
If any corrections were needed, those should be performed at this time.
3-6-14 Unable to Implement any Requirements?
If the Trial Designer and/or Developer were unable to implement any requirements for whatever reason, those should be noted. It may be that a requirement was deemed unfeasible to implement or that time constraints did not allow completion of all tasks.
3-6-15 Record Unmet Requirements for Client Notification
The client should be notified if any requirements were not met. They may decide to abandon certain requirements, delay testing until all design is completed, or mark certain non-critical requirements as outstanding, to be completed at a later date.
3-6-3-0 Design Randomization / Drug Inventory
General Information
Process ID
3-6-3-0
Process Purpose
This process outlines the steps for designing the Randomization and Drug Inventory features of an eClinical trial.
Flow Diagram

Interface Description
Entrance Criteria
Advanced requirements are ready to be implemented
Inputs
Randomization and/or Drug Inventory specifications/requirements
Outputs
Working Randomization and/or Drug Inventory features
Exit Criteria
Design of all Randomization and/or Drug Inventory requirements completed
Procedural Description
Responsibilities
The Trial Designer develops the necessary configuration for Randomization and/or Drug Inventory. If necessary, Fountayn can be contracted to complete certain steps of the design process.
3-6-3-1 Create Tools
Fountayn personnel will create the necessary tools in the eClinical application for Randomization and Drug Inventory to function appropriately.
3-6-3-2 Grant Access
Access must be granted to the tools created in step 3-6-3-1.
3-6-3-3 Enroll Records
A Record must be enrolled in the Randomization Managers for the various eClinical environments (design, test, approve, production). These records will allow management of Randomization and Drug Inventory for the study.
3-6-3-4 Gather IDs
IDs of the various eClinical sites, Randomization Managers, and Records must be collected.
3-6-3-5 Configure Bridges
Bridges must be configured between the eClinical site IDs and the Randomization Manager IDs.
3-6-3-6 Configure DataArchitect
The DataArchitect file should be configured based on the specifications from the client. These configurations will be used by the Randomization Manager to make your Randomization and/or Drug Inventory features ready for use.
3-6-3-7 Import Configuration
After the DataArchitect has been configured correctly, setup can begin online in the Randomization Manager. The configuration in the DataArchitect will be loaded to the Randomization Manager, including Drug Types, Treatment Types, Strata, Factors, and Packaging Companies.
3-6-3-8 Create Schedule
After the Strata have been loaded, a Randomization Schedule can be created based on study requirements.
3-6-3-9 Import / Create Inventory
If Drug Inventory is being managed with eClinical, the Inventory items can be created or imported from a pre-determined list. When inventory is created, the label numbers, how many items there are in a container, how many of each drug type, and which packaging company to be used can all be configured.
4-0 Test
General Information
Process ID
4-0
Process Purpose
This process outlines the steps for moving a trial version through the testing process.
Flow Diagram

Interface Description
Entrance Criteria
A version of the trial must be configured and ready to be deployed on the Test server.
Inputs
Configured Trial Version
Outputs
Verified and Validated Trial Version
Exit Criteria
The version of the trial has completed verification and validation activities and is ready for deployment on the Approve server for User Acceptance Testing.
Procedural Description
Responsibilities
The Trial Designer must flag the appropriate version for testing. The party responsible for verification and validation testing procedures must load the appropriate revision to the Test server and perform documented testing procedures.
4-1 Has Revision been Flagged for Testing?
Before a version can be loaded to the Test server, it must be flagged for testing. If the appropriate version has already been flagged, please proceed to 4-3 Load Revision to Test Server. If the appropriate version has not been flagged, proceed to 4-2 Flag Revision for Testing.
4-2 Flag Revision for Testing
Before a revision can be loaded to the Test server, it must be flagged by the Trial Designer. Please see the Testing a Trial Testing a Trial: Flagging a Version section of the Trial Manager Manual for more information.
4-3 Load Revision to Test server
Before a revision can be accessed for testing, it must be loaded to the Test server. Please see the Testing a Trial: Loading a Version section of the Trial Manager Manual for more information.
4-4 Has Testing Network been Created?
A site (tool) network must be created for testing activities to be performed. If a site network does not exist, it must be created – see 4-7 Create Testing Network. If a testing network already exists, please proceed to 4-5 Perform Testing Activities.
4-5-0 Perform Testing Activities
Each client has its own documented processes for performing Verification and Validation Testing. These activities are not managed through the software, but documentation can be augmented through the software – annotated casebooks; exports of testing data, queries, alerts; screen prints, etc. Testing activities should be performed, documented and retained as part of the validation package.
4-6 Notify Team Revision Tested
The appropriate team members should be notified when the revision passes testing. After the revision passes testing, it is ready to load to the Approve server for User Acceptance Testing.
4-7 Create Testing Network
A site (tool) network must be in place so that testing can take place. The site network should mimic the production network so that all features of the study can be fully tested. For example, if the study requires subject identification numbers to be assigned sequentially across sites, then the site network should include at least two sites in order to adequately test the subject id assignment. Please see the All Sites – Managing the Site Network section of the Trial Manager Manual for more information.
4-5-0 Perform Testing Activities
General Information
Process ID
4-5-0
Process Purpose
This process outlines the steps for testing a version of a study.
Flow Diagram

Interface Description
Entrance Criteria
A version of the trial must be flagged for test and subsequently loaded to the Test server.
Inputs
Version loaded to test
Outputs
Completed testing documentation
Exit Criteria
The version of the trial has completed verification and validation activities and all testing documentation has been completed.
Procedural Description
Responsibilities
The testing party responsible for verification and validation testing procedures must load the appropriate revision to the Test server and perform documented testing procedures.
4-5-1 Review Requirements
The tester should review all requirements and specifications for the study, in order to familiarize themselves with the study and understand the study’s specifications and intended functionality.
4-5-2 Locate Source Documentation
Copies of the source documentation should be obtained, in order to be compared against when testing the eCRFs and eClinical features.
4-5-3 Test Data Points
All Data Points should be tested to ensure they match the source documentation. Forms should appear at the correct visit(s) and contain the correct questions. Questions should have the correct text and answer options.
4-5-4 Test Dependencies
Each dependency (edit check) should trigger at the appropriate time, and conversely, not appear when data is entered correctly. Dependency text and logic should be consistent within the study.
4-5-5 Test Roles and Permissions
Roles and permissions should be configured in a consistent manner. For example, roles with read-only access to eCRF data (i.e. Auditor or Monitor) should not be able to enter data, while Investigators and/or Coordinators should be able to.
4-5-6 Test Other Configuration
Basic assignments, workviews, checklists, the visit schedule, the patient management report, and other features should be configured correctly and behave appropriate.
4-5-7 Test Scripts
All scripts should work as intended. The nature of the scripting language means that a variety of actions or checks can be performed with a script; each of these should be verified to be working correctly. Note that some scripts maybe be tied to another component of the study (e.g. imports) and will be tested as part of that functionality.
4-5-8 Test Custom Exports
Data should be exported to the appropriate tables and with the correct format. Data may be combined or split on export, or given a label; all of these features should work correctly.
4-5-9 Test Imports
When a valid file is imported, the data should arrive at the appropriate patient and form, and not be modified unless explicitly designed as part of the import.
4-5-10 Test Randomization
Randomization featurse should work correctly according to specifications. The correct strata, treatment type, drug type, randomization number, and other randomization-related data should be assigned appropriately.
4-5-11 Test Drug Inventory
Inventory should be tracked and managed correctly. Threshold levels, initial shipments, packaging companies, automatic kit assignments, kit numbers, and other inventory-related data should be assigned appropriately.
4-5-12 Record Defects
As components are tested, almost certainly defects, or “bugs”, will be found. The entity responsible to trial verification and validation will have a defect tracking system that is used to record, monitor, and resolve these defects.
4-5-13 Test Defect Corrections
As defects are corrected by the Service Provider, the Tester must re-test the item that originally caused the defect. If the solution to the defect caused a change to another piece of functionality, that changed must also be tested. As issues are resolved and tested, those actions should be recorded in the appropriate defect tracking software.
4-5-14 Review Testing Documentation Against Requirements
After testing of all components has been completed, the requirements and specifications should be reviewed again to ensure all pieces of the study were tested.
4-5-15 Have all Requirements Been Tested?
If all requirements have been tested, proceed to step 4-5-17 Verify Testing Documentation has Appropriate Signatures. If not, proceed to step 4-5-16 Test Requirements Still Outstanding.
4-5-16 Test Requirements Still Outstanding
Any requirements that were missed in the testing stage (steps 4-5-3 to 4-5-13) should be tested at this point.
4-5-17 Verify Testing Documentation has Appropriate Signatures
Documentation should exist for all testing performed under 4-5-0 Perform Testing Activities.
5-0 Approve
General Information
Process ID
5-0
Process Purpose
This process outlines the steps for moving a trial version through the approval process.
Flow Diagram

Interface Description
Entrance Criteria
A version of the trial must be tested and ready to be deployed on the Approve server.
Inputs
Tested Trial Version
Outputs
User Acceptance Tested Trial Version
Exit Criteria
The version of the trial has passed User Acceptance Testing and is ready for deployment on the Production server.
Procedural Description
Responsibilities
The Project Manager must coordinate User Acceptance Testing activities for the appropriate trial version. The Client or party responsible for User Acceptance Testing must perform documented testing procedures.
5-1 Has Revision been Flagged for UAT?
Before a version can be loaded to the Approve server, it must be flagged for UAT. If the appropriate version has not been flagged, proceed to 5-4 Flag Revision for UAT. If the appropriate version has already been flagged, please proceed to 5-2 Load Revision to Approve Server.
5-2 Load Revision to Approve server
Before a revision can be accessed for User Acceptance Testing, it must be loaded to the Approve server by the Project Manager. Please see the Approving a Trial: Loading a Version section of the Trial Manager Manual for more information.
5-3 Has UAT Network been Created?
A site (tool) network must be created for UAT activities to be performed. If a site network does not exist, it must be created – see 5-5 Create UAT Network. If a UAT network already exists, please proceed to 5-6 Perform UAT Activities.
5-4 Flag Revision for UAT
Before a revision can be loaded to the Approve server, it must be flagged by the Project Manager. Please see the Approving a Trial: Flagging a Version section of the Trial Manager Manual for more information.
5-5 Create UAT Network
A site (tool) network must be in place so that testing can take place. The site network should mimic the production network so that all features of the study can be fully tested. For example, if the study requires subject identification numbers to be assigned sequentially across sites, then the site network should include at least two sites in order to adequately test the subject id assignment. Please see the All Sites – Managing the Site Network section of the Trial Manager Manual for more information.
5-6 Perform UAT Activities
Each client has its own documented processes for performing User Acceptance Testing. These activities are not managed through the software, but documentation can be augmented through the software – annotated casebooks; exports of testing data, queries, alerts; screen prints, etc. UAT activities should be performed, documented and retained for future use in audits and as part of the study close documentation.
5-7 Notify Team Revision Tested
The appropriate team members should be notified when the revision passes User Acceptance Testing. After the revision passes testing, it is ready to be loaded to the Production server for deployment.
6-0 Production Deployment
General Information
Process ID
6-0
Process Purpose
This process outlines the steps necessary for deploying a trial to the Production server.
Flow Diagram

Interface Description
Entrance Criteria
Testing must be completed and the trial approved by Quality Assurance or the appropriate party.
Inputs
Completed Trial Design, Known Users and their Access Rights (Role), Lab Files, Randomization Scheme and Inventory Assignments
Outputs
Trial Infrastructure for Data Input
Exit Criteria
The trial’s Data Pyramid is in place, and the application is ready for data entry.
Procedural Description
Responsibilities
The Project Manager must set up the Data Pyramid and Users along with other potential components of the trial – Randomization, Drug Inventory Management, Lab Imports, etc.
6-1 Load to Production
After the completion of testing and Quality Assurance approval, the trial is ready to be loaded on the Production server for additional configuration and assignment of users. The Project Manager is responsible for loading the trial to the Production server. Please see the Deploying a Trial: Loading a Version section of the Trial Manager Manual for more information.
6-2 Does Trial Contain Randomization?
If the trial contains Randomization then setting up the Randomization Manager is required – proceed to 6-5-0 Set Up Randomization Manager. Please note that the Randomization Manager may be set up earlier in the process but must be in place before the users are assigned to the trial. If the trial does not contain Randomization, proceed to 6-3 Does Trial Contain Drug Inventory Management?.
6-3 Does Trial Contain Drug Inventory Management?
If the trial contains Drug Inventory Management then the inventory must be populated – proceed to 6-6-0 Populate Inventory. Please note that the inventory may be populated earlier in the process but must be in place before the users are assigned to the trial. If the trial does not contain Drug Inventory Management, proceed to 6-4 Does Trial Contain Lab Imports?.
6-4 Does Trial Contain Lab Imports?
If the trial contains Lab Imports then a workgroup must be set up so that the lab can upload the data files – proceed to 6-7 Create Lab Workgroup. The lab users are granted access to the workgroup, not the actual trial application, to securely upload the patient lab data. Please note that the lab workgroup may be set up earlier in the process but must be in place before the users are assigned to the trial. If the trial does not contain Lab Imports, proceed to 6-8 Create Sites Data Pyramid.
6-5-0 Configure Randomization
The Randomization Manager is the user interface into the Randomization module. It allows unblinded users to view, report and export (dependent on role) strata assignments, site inventories, trial inventories, site drug confirmations and other information related to randomization and inventory.
6-6-0 Configure Drug Inventory
Before Inventory can be utilized in Randomization, it must be populated, and the initial inventory levels assigned to sites. The study design dictates how inventory is assigned and replenished at the sites. Most trials require the site to confirm drug receipt and utilize emails as notifications for confirmation of receipt and re-ordering of drugs and associated supplies.
6-7 Create Lab Workgroup
The lab workgroup serves as a repository for all raw lab data files throughout the trial. The lab users will upload the data files to the workgroup’s File Manager and then the appropriate role, usually the Project Manager, will upload the lab file into the trial application. All workgroups are set up through the same process. Please see 1-2-0 Create Trial Manager Workgroup for more information on setting up a workgroup.
6-8 Create Sites Data Pyramid
The Sites Data Pyramid is a hierarchical representation of the study and its management. The standard Data Pyramid for trials with multiple sites contains an “All Sites” tool at the top of the pyramid. The “All Sites” tool is comprised of a view of the individual investigative sites, which are a layer beneath. The Data Pyramid can be expanded to represent the management of larger, international trials. For example, sites can be divided into regions and monitors granted access by region. The Data Pyramid may have as many layers or groupings as needed. The Sites Data Pyramid is created in the Trial Manager. Please see the All Sites – Managing the Site Network section of the Trial Manager Manual for more information. Please note that the Data Pyramid may be set up earlier in the process but must be in place before the users are assigned to the trial.
6-9-0 Assign Users
The final step of Production Deployment is the assignment of users. Users should be assigned to the role that most accurately reflects their trial responsibilities. User assignment is performed through the Enterprise Manager.
6-5-0 Configure Randomization
General Information
Process ID
6-5-0
Process Purpose
This process outlines the steps necessary for configuring the Randomization Manager for production use in a study employing Fountayn Randomization.
Flow Diagram

Interface Description
Entrance Criteria
Study must be ready for production deployment and using randomization
Inputs
Approved study version loaded to production
Outputs
Configured Randomization Manager
Exit Criteria
Randomization Manager has been configured and is ready to activate patients.
Procedural Description
Responsibilities
The Trial Designer will typically be the one to configure the Randomization Manager.
6-5-1 Load Strata
Loading the strata will pull the information configured in DataArchitect into the study. This will make strata available for population, in order that patients can be activated.
6-5-2 Load Drug Types and Treatment Types
Drug types and treatment types will also be loaded from DataArchitect.
6-5-3 Populate Strata
The strata should be populated according to the specifications generated by the sponsor. In particular, the block size and total number of strata to be populated should be known.
6-6-0 Configure Drug Inventory
General Information
Process ID
6-6-0
Process Purpose
This process outlines the steps necessary for configuring the Randomization Manager for production use in a study employing Fountayn Drug Inventory.
Flow Diagram

Interface Description
Entrance Criteria
Study must be ready for production deployment and using drug inventory
Inputs
Approved study version loaded to production
Outputs
Configured Drug Inventory
Exit Criteria
Drug Inventory has been configured and is ready for initial shipments.
Procedural Description
Responsibilities
The Trial Designer will typically be the one to configure Drug Inventory. In a double-blind study, it may not be a person involved in the disbursement of treatment or otherwise having contact with patients.
6-6-1 Load Packaging Companies
Before drug inventory can be created, packaging companies must be loaded. They will be created from the information configured in the DataArchitect.
6-5-2 Will Inventory List be Imported?
Some sponsors will manually create a list of drug inventory kits, others will have Fountayn Drug Inventory software automatically generate that list.
6-5-3 Import Inventory
If the sponsor has elected to handle the creation of the drug inventory list, then it will be imported into eClinical.
6-5-4 Populate Inventory
If the sponsor has not elected to handle the creation of the drug inventory list, then it will be automatically generated by Fountayn Drug Inventory software.
7-0 Data Capture and Management
General Information
Process ID
7-0
Process Purpose
Collect and clean trial data so that the data can be submitted to regulatory authorities.
Flow Diagram

Interface Description
Entrance Criteria
The trial must be released to Production.
Inputs
Approved Production Trial
Outputs
Clean, Validated Data
Exit Criteria
All sites have clean, locked and signed data.
Procedural Description
Responsibilities
Coordinators and Investigators enter data. Monitors and Data Managers review, SDV, and lock data. Investigators sign data.
7-1 Access or Enroll Patient
The Coordinator or Investigator should access an existing patient or enroll a new patient so that data entry can begin. Please see the Data Entry section of the EDC Manual for more information.
7-2-0 Enter Data
The Coordinator or Investigator enters data in the form.
7-3 Is Data Clean?
The data point is considered clean if the Alerts for the datapoint are Closed and no queries exist for the data point. If the data is clean proceed to 7-5 Prepare for SDV. If the data is not clean proceed to 7-4-0 Clean Data.
7-4-0 Clean Data
The Monitors and Data Managers review the data to ensure that it is clean. Interaction with the site is necessary for data cleaning – sites must respond to queries, update incorrect data and enter missing data.
7-5 Prepare for SDV
Both coordinators and monitors must prepare for the SDV process. Site participants must ensure all data has been entered to the best of their ability, make certain all possible alerts and queries have been resolved and prepare data source and facilities for the monitor’s site visit. Monitors need to follow up with the site to make sure all is ready for the monitoring visit. Monitors can also remotely clean the data by issuing queries for missing data and unclear responses prior to the trip. Monitors can filter data for anomalies and problem areas utilizing the Alert, Query and Form Managers prior to the monitoring visit. Having a scheduled plan for data review is the key to a successful monitoring visit and preparing data for SDV.
7-6 Does Data Match?
The data in the eClinical system must match the data in the patient’s medical chart or source documents. If the data does not match, the data must undergo the data cleaning process as defined in 7-4-0 Clean Data. If the data matches, the data point should be marked as “SDVed” as defined in 7-7 SDV Data Point.
7-7 SDV Data Point
If the data matches, the data point should be marked as “SDVed”. Please see the Apply Metadata Statuses for Question Level or Apply Metadata Statuses for Form Level sections of the EDC Manual for more information on applying SDV Status.
7-8 Lock Data Point
After the data has been SDVed, it is ready to be locked. The Monitors and/or Data Managers can lock the data. Please see the Apply Metadata Statuses for Question Level or Apply Metadata Statuses for Form Level sections of the EDC Manual for more information on locking data.
7-9 Sign
The last step of the cleaning process is signing the data. After reviewing the patient’s casebook, the Investigator applies an electronic signature to the data to signify his review and approval of the patient’s data. Please see the Apply and Clear Metadata Statuses section of the Subject Manager for more information on applying electronic signatures.
7-10-0 Adverse Event Management
During the course of the study, patients may experience Adverse Events. These should be cataloged by study staff, and if necessary, break the code, report to regulatory authorities, and/or perform medical coding.
7-11-0 Randomize Patients
For any study requiring randomization, that process must adhere to a particular workflow. Study personnel work with the eClinical software to ensure that only eligible patients are randomized.
7-12-0 Manage Drug Inventory
For any study employing drug inventory management, that process must adhere to a particular workflow. Study personnel work with the eClinical software to ensure that drug is dispensed and tracked correctly.
7-2-0 Enter Data
General Information
Process ID
7-2-0
Process Purpose
Enter data on a form and respond to the best of your ability to the system generated alerts.
Flow Diagram
Interface Description
Entrance Criteria
A patient or subject must be enrolled in the study and be accessible to the user.
Inputs
Patient’s Clinical Data
Outputs
Clean or Unclean Data
Exit Criteria
Data is saved inside the patient’s casebook.
Procedural Description
Responsibilities
Persons with data entry responsibilities enter data into the eCRF.
7-2-1 Enter Data Points
The person with data entry responsibility enters data on the form to the best of their ability and saves the form. Please see the Data Entry section of the EDC Manual for more information.
7-2-2 Is Data Point Alerted?
Upon submission of the eCRF, the system evaluates the data against predefined parameters. If the data meets the predefined criteria, the form saves and returns the users to the appropriate Form Summary. If the data does not meet the predefined parameters, then the form redisplays with the data alerted. The data entry person should review the alerted data for potential data entry errors. If the data point is not alerted proceed to 7-2-8 Is Data Point Blank?. If the data point is alerted proceed to 7-2-3 Is Data Point Blank?.
7-2-3 Is Data Point Blank?
If the data point is alerted and blank proceed to 7-2-5 Is Missing Data Specified?. If the data point is alerted and has a value proceed to 7-2-4 Data Possibly Has Problem.
7-2-4 Data Possibly Has Problem
The data exists but may have a problem because the data is alerted. Alerted data is considered unclean data.
7-2-5 Is Missing Data Specified?
Is the reason for missing data specified by the data entry person? If the missing data is specified, proceed to 7-2-7 Data ND, NK or NA. If missing data is not specified, proceed to 7-2-6 Data Blank.
7-2-6 Data Blank
This data point is blank and requires an answer, thus it is an unclean data point.
7-2-7 Data ND, NK, or NA
This data point has been specified as missing data that will not be collected. Not Done (ND), Not Known (NK) and Not Applicable (NA) are the most common designations. Because this data point should be reviewed to ensure the data could not have been collected, it is considered as an unclean data point.
7-2-8 Is Data Point Blank?
If the data point is not alerted and contains data, proceed to 7-2-10 Data Clean. If the data point is not alerted and does not have a value, proceed to 7-2-9 Data Not Expected.
7-2-9 Data Not Expected
In this instance, no data is expected, thus the data point is considered to be clean.
7-2-10 Data Clean
The data entered is not alerted, thus the data point is considered to be clean.
7-2-11 Unclean Data Point
Unclean data points must go through the data cleaning process as defined in 7-4-0 Clean Data. Data must be clean before it can be considered for SDV.
7-2-12 Clean Data Point
Clean data points are ready for SDV and enter the Collect and Clean Data process at 7-5 Prepare for SDV.
7-4-0 Clean Data
General Information
Process ID
7-4-0
Process Purpose
Clean trial data so that the data can be submitted to regulatory authorities.
Flow Diagram
Interface Description
Entrance Criteria
Data point must be considered unclean – resulting from 7-2-11 Unclean Data Point of the 7-2-0 Enter Data process.
Inputs
Unclean Data
Outputs
Clean Data
Exit Criteria
Cleaned data is saved in the patient’s casebook.
Procedural Description
Responsibilities
Persons with data cleaning responsibilities (monitors, data managers, coordinators and investigators) clean the data.
7-4-1 Review Open Alerts
Access the Alert Manager to quickly review all open issues. Please see the Alert Manager section of the EDC Manual for more information.
7-4-2 Is Alert an Issue?
Alerts are used for many different types of edit checks – range, clinical, format, etc. Review the alert to determine if the alerted data is an issue – does it require additional actions to be performed by the site? If the alert is an issue, continue to 7-4-4 Open Query. If the alert is not an issue, it can be closed as described in 7-4-3 Close Alert.
7-4-3 Close Alert
Alerts that do not require additional action by the site should be closed as part of the data cleaning process.
To close alerts (either from the Alert Manager or from the eCRF), please see the Updating an Alert section of the EDC Manual for more information.
7-4-4 Open Query
Data points that seem incorrect or need further clarification require a query. Data Managers and Monitors generate queries to notify the site personnel that there is an issue with the data point.
Queries can be generated from the Alert Manager or from the eCRF. For information on generating queries from the Alert Manager, please see the Generating a Query from the Alert Manager section of the EDC Manual for more information. Information on how to generate a query from the eCRF can be found in the Generating a Query section of the EDC Manual.
Depending on the study configuration a newly issued query can be moved to one of two states: Unconfirmed or New. The ‘Unconfirmed’ state allows for internal review before it is visible to the site for resolution. The ‘New’ state is visible to the appropriate site personnel upon creation of the query.
7-4-5 Review Query
Once a query has been issued to the site, it will be categorized as a ‘New’ query and should be reviewed by the Coordinator or Investigator for resolution. Queries usually require a data change or a clarification. Proceed to 7-4-6 for evaluation of the query.
7-4-6 Need Data Change?
If the query requires a data change, please proceed to 7-2-0 Enter Data. If the query does not require a data change, then a clarification or response will be required as described in 7-4-7 Respond to Query.
7-4-7 Respond to Query
Queries may require a written explanation or clarification. Please see the Responding to a Query section of the EDC Manual for more information on responding to a query.
7-4-8 Is Resolved Properly?
After the Coordinator or Investigator responds to a query, it is moved to the ‘Open – Answered’ state and is ready for review by the Data Manager or Monitor to ensure it is resolved properly. If the query response is adequate, the query should be closed as identified in 7-4-10 Close Query. If the query response does not properly resolve the issue and requires further clarification, the query should be reopened as described in 7-4-9 Reopen Query.
7-4-9 Reopen Query (Reopened)
The Data Manager and/or Monitor are required to reopen queries when the responses are not sufficient. Reopening queries moves the query to the ‘Open – Reopened’ state for additional clarification from the Coordinator or Investigator. Please see the Closing / Reopening a Query section of the EDC Manual for more information on reopening a query.
7-4-10 Close Query (Closed)
Once the query has been properly resolved, it is ready to be closed. The query is moved to the final state, ‘Closed’, after the completion of this step. Please see the Closing / Reopening a Query section of the EDC Manual for more information on closing a query.
7-10-0 Adverse Event Management
General Information
Process ID
7-10-0
Process Purpose
Manage Adverse Events, including breaking of the code and Serious AE reporting.
Flow Diagram
Interface Description
Entrance Criteria
A patient experiences an Adverse Event.
Inputs
Adverse Event
Outputs
Fully coded and cataloged event with regulatory filing (if necessary)
Exit Criteria
Adverse Event is coded and resolved
Procedural Description
Responsibilities
Persons with data entry and cleaning responsibilities (monitors, data managers, coordinators and investigators) file and report the Adverse Event.
7-10-1 Patient Experiences an Adverse Event
A patient may experience an Adverse Event at any time. Study personnel will act on the Adverse Event as soon as they are made aware of it.
7-10-2 Does Treatment Require Breaking the Code?
In extreme situations, the Investigator or Monitor will require knowledge of the treatment being given to the patient. Without this information, it would be potentially dangerous to prescribe Concomitant Medications or continue treatment of the study drug.
7-10-3 Record Breaking of the Code
Any time the code is broken, it must be recorded, typically within the Fountayn Platform. Appropriate study personnel should be notified whenever this occurs.
7-10-4 Record a New AE CRF
When the site personnel are made aware of the Adverse Event, they should record it in the Fountayn Platform. This entails creation of a new repeatable Adverse Event form. The details of the Adverse Event should be entered to the best of their ability and the patient’s memory.
7-10-5 Is AE Serious?
Serious Adverse Events require special handling by study personnel. The severity of the Adverse Event should be recorded in the eCRF in the previous step.
7-10-6 Enter Serious AE Data
Typically, the CRF will have additional data entry fields specifically for Serious Adverse Events. These should be entered by study personnel whenever a Serious Adverse Event occurs.
7-10-7 Notification of Serious Adverse Event
Most Fountayn studies will have an Email Trigger automatically notify the appropriate Monitor and other study management personnel. If not, notification should be performed manually by the site personnel as soon as possible.
7-10-8 Is Reporting Required by Local Legislation?
Almost all regions require Serious Adverse Events to be reported to a governing body. Study personnel must be aware if that requirement exists for their study.
7-10-9 Report Serious Adverse Event to Regulatory Body
The exact timing and specifications of this report may vary from region to region, but if any report is required it should be sent as soon as possible.
7-4-10 Report Serious Adverse Event to Service Provider
7-13-0 Medical Coding
The Adverse Event should be assigned the proper medical code.
7-11-0 Randomize Patients
General Information
Process ID
7-11-0
Process Purpose
Make use of eClinical software to manage patient randomization.
Flow Diagram
Interface Description
Entrance Criteria
A patient is ready to be randomized and the study is ready to begin randomizing patients.
Inputs
Screening patient
Outputs
Randomized patient
Exit Criteria
Patient is randomized correctly and assigned a randomization number and any other necessary randomization receipts.
Procedural Description
Responsibilities
The Coordinator or Investigator will interface with the eClinical software to randomize patients.
7-11-1 Attempt to Randomize Patient
Once the Coordinator/Investigator (or other role as appropriate) has deemed the patient ready to be randomized, they will select the “Activate” link in eClinical. This will instruct the software to attempt to randomize the patient, according to a set a predefined rules.
7-11-2 Does Patient Meet Activation Criteria?
The software will determine if the patient meets a set of predefined rules and is eligible for randomization. If yes, proceed to 7-11-3 Determine and Assign Randomization Number. If no, proceed to 7-11-7 Display Warning.
7-11-3 Determine and Assign Randomization Number
The software will determine the appropriate randomization number and assign that to the patient. This number may depend on patient stratification, site location, or any number of other factors, all predefined and configured by study design personnel.
7-11-4 Will New eCRFs be Available?
In many cases, the full casebook will only be available in eClinical to randomized patients. If that is the case, proceed to 7-11-5 Make New eCRFs Available. If not, proceed to 7-11-6 Receive Randomization Confirmation and Receipt.
7-11-5 Make New eCRFs Available
If the study design indicates that new eCRFs should be available in eClinical for randomized patients, those forms should be made available now. This will usually be done by the configuration of certain scripts by the Trial Designer, which instructs the software what forms to create and where.
7-11-6 Receive Randomization Confirmation and Receipt
After the patient has been randomized successfully, the software will return a randomization receipt to the user who activated the patient. This configurable receipt usually includes pertinent information such as randomization number, date and time of randomization, name of activating user, patient initials, etc. The receipt may be printed by the user for record keeping.
7-11-7 Display Warning
If the software determines that not all randomization criteria have been met, it will return an error to the user indicating the individual criteria that have not been met. It will not be possible to randomize a patient that has not met all criteria successfully.
7-12-0 Manage Drug Inventory
General Information
Process ID
7-12-0
Process Purpose
Make use of eClinical software to manage drug inventory and supply.
Flow Diagram
Interface Description
Entrance Criteria
A study employing drug inventory/supply management has entered the production phase.
Inputs
A patient is ready to receive drug
Outputs
Virtual inventory adjustment
Exit Criteria
All patients have received all necessary drug or study is no longer active.
Procedural Description
Responsibilities
The Coordinator or Investigator will interface with the eClinical software to manage drug inventory at the site. Other personnel will manage inventory across all sites and at the packaging company or companies.
7-12-1 Indicate Patient Ready for Next Treatment
The Coordinator or Investigator will indicate in eClinical when a patient is ready for drug treatment. This may occur at activation or at any other time(s) during the course of the study. Depending on the design of the study, the indication that the patient is ready for new drug may happen automatically, or the user may need to explicitly state it.
7-12-2 Is Site Inventory Empty?
Drug cannot be dispensed if there is none at the site. The Fountayn Drug Inventory software will query the virtual inventory and determine if drug is available. If the site inventory is empty, proceed to 7-12-9 Display Warning. If not, proceed to 7-12-3 Decrement Virtual Inventory, Assign Treatment Kit to Patient.
7-12-3 Decrement Virtual Inventory, Assign Treatment Kit to Patient
Upon assigning the drug to the patient, the virtual inventory must be decremented at the site to prevent that same kit being assigned to another patient, and to prevent drug from being assigned when there is no real drug left at the site.
7-12-4 Administer Corresponding Real-World Treatment Kit
The Fountayn Drug Inventory software will indicate to the Coordinator or Investigator which drug kit to administer to the patient. When this information is received, the study personnel should administer the drug according to the dosing parameters.
7-12-5 Does Inventory Now Meet Resupply Threshold?
If the site inventory falls to a certain level, depending on the design of the study new inventory may be requested from the warehouse or packaging company. If the site inventory now meets this threshold level, proceed to 7-12-6 Request Inventory from Packaging Company. If not, proceed to Stop.
7-12-6 Request Inventory from Packaging Company or Warehouse
The Fountayn Drug Inventory software will send an automated email notification to the Packaging Company or Warehouse, instructing them to send new drug kits to the site. This email will indicate which particular kits to send.
7-12-7 Confirm Inventory Shipment
When the drug arrives physically at the site, the Coordinator or Investigator needs to confirm this in eClinical. This will for drug to be accurately tracked in the virtual inventory and will allow new drug to be assigned to patients at the site.
7-12-8 Adjust Virtual Inventories
After shipment confirmation, the Fountayn Drug Inventory software will adjust the virtual inventory appropriately. Some drug kits may have been marked as damaged or missing; these will be cataloged appropriately.
7-12-9 Display Warning
If the site inventory is empty, no new drug can be assigned to patients. The software will display an error message to the user letting them know.
7-12-10 Inventory Requested from Packaging Company?
If a new drug shipment has not already been requested from the packaging company, proceed to step 7-12-6 Request Inventory from Packaging Company or Warehouse. If it has, proceed to Stop.
8-0 Trial Close
General Information
Process ID
8-0
Process Purpose
This process outlines the steps for closing out a trial.
Flow Diagram
Interface Description
Entrance Criteria
The Project Manager must receive notification the trial is ready for closure.
Inputs
Clean Data, Notification of Trial Close
Outputs
Archived Data
Exit Criteria
The trial has been properly archived, and data archives submitted to the appropriate parties.
Procedural Description
Responsibilities
The trial must be properly archived, including removal of users and archival of data.
8-1 Have Exports been Configured?
When exporting the data for archival, the trial must be configured for the appropriate exports. If the study has not been configured with the required exports, schedule a mid-study change to update the exports as defined in 8-3 Configure Exports. If the study has been configured with the appropriate exports, proceed to 8-2-0 Archive Data.
8-2-0 Archive Data
Archiving the data may consist of several components – PDF export; Text, SAS and/or Excel exports; study documents, users, etc. Please verify the requirements for Archival.
8-3 Configure Exports
The exports can be configured through DataArchitect or VisualArchitect. For DataArchitect configurations for Text, Excel and SAS, please see the Exports section of the DataArchitect Manual. For DataArchitect configurations of the PDF Archival export, please see the PDF Archival section of the DataArchitect Manual. For VisualArchitect configurations, please see the Exports Tab section of the VisualArchitect Manual.
8-4-0 User Access Management
During the trial close process, User Access varies from trial-to-trial, sponsor-to-sponsor. Study participants can be granted read-only access, statisticians may be granted export-only access or users can be removed entirely. The final step of the Trial Close process is the removal of all users’ access.
8-2-0 Archive Data
General Information
Process ID
8-2-0
Process Purpose
This process outlines the steps for archiving data.
Flow Diagram
Interface Description
Entrance Criteria
The eSubmission export must be configured for the study.
Inputs
Clean Data, Notification of Trial Close, eSubmission Export Configuration
Outputs
Archived Data
Exit Criteria
The trial has been properly archived, and data archives submitted to the appropriate parties.
Procedural Description
Responsibilities
The Project Manager should ensure the trial has been properly archived, including all export formats and any study documentation.
8-2-1 Does the Study Require a Text Export?
Text is one of four formats to which the study data can be exported. If the study requires a Text export, please see the Exporting Data section of the EDC Manual for more information and proceed to 8-2-5 Run Export and Write to Media. If the study does not require a Text Export, proceed to 8-2-2 Does the Study Require an Excel Export?.
8-2-2 Does the Study Require an Excel Export?
Excel is one of four formats to which the study data can be exported. If the study requires an Excel export, please see the Exporting Data section of the EDC Manual for more information and proceed to 8-2-6 Run Export and Write to Media. If the study does not require an Excel Export, proceed to 8-2-3 Does the Study Require a SAS Export?.
8-2-3 Does the Study Require a SAS Export?
SAS is one of four formats to which the study data can be exported. If the study requires a SAS export, please see the Exporting Data section of the EDC Manual for more information and proceed to 8-2-7 Run Export and Write to Media. If the study does not require a SAS Export, proceed to 8-2-4 Does the Study Require a PDF Export?.
8-2-4 Does the Study Require a PDF Export?
PDF is one of four formats to which the study data can be exported and is the format used for eSubmission. If the study requires a PDF export, please see the Exporting Data section of the EDC Manual for more information and proceed to 8-2-8 Run Export and Write to Media. If the study does not require a PDF Export, proceed to 8-2-9 Does Study Require Additional Documentation Archival?.
8-2-5, 8-2-6, 8-2-7 and 8-2-8 Run Export and Write to Media
If the Study requires an export, the export should be executed and written to the desired media (CD, DVD, Tape, etc). For more information on exporting data, please see the Exporting Data section of the EDC Manual. For more information on writing the data to the appropriate media, please see the manual specific to the media writing device.
8-2-9 Does Study Require Additional Documentation Archival?
Depending on study components, there may be additional study documentation and reference files that should be written to media for archival purposes. These may include study project plans, protocol amendments, lab source files, images, testing plans, etc. Please verify study requirements for the archival of additional documentation. If the study does not require additional archival, the process is complete; however, if the study requires additional document archival, proceed to 8-2-10 Write to Media.
8-2-10 Write to Media
If the Study requires archival of additional study documentation, the files should be written to the desired media (CD, DVD, Tape, etc). For more information on writing the data to the appropriate media, please see the manual specific to the media writing device.
8-4-0 User Access Management
General Information
Process ID
8-4-0
Process Purpose
This process outlines the steps for managing users during the trial close period.
Flow Diagram
Interface Description
Entrance Criteria
The Project Manager must receive notification the trial is ready for closure.
Inputs
Clean Data, Notification of Trial Close
Outputs
N/A
Exit Criteria
The users no longer have access to the trial.
Procedural Description
Responsibilities
During the Trial Close process, the Project Manager is responsible for user access management. Users may require read-only access or export restricted access, or the sponsor may request all users to be removed with the exception of the person performing the archival. The Project Manager must ensure the trial requirements are implemented and then instruct the removal of all remaining users once the archival is completed.
8-4-1 Do Any Users Require Read-Only Access?
When the Trial Close process commences, users may have their access restricted or removed. Depending on sponsor requirements, user access is modified to support internal trial close procedures. For example, site personnel and monitors may be limited to read-only access, and all export access with the exception of statisticians maybe removed. Please review sponsor requirements to determine if any users require read-only access. If users require read-only access, proceed to 8-4-4 Modify User Access, and if no users require read-only access to the study, please see 8-4-2 Has All Data been Archived?.
8-4-2 Has All Data been Archived?
Verify all study data has been archived. If data has not been archived, please see 8-2-0 Archive Data. If all data has been archived, proceed to 8-4-3 Remove User Access.
8-4-3 Remove User Access
After all data has been reviewed and archived, all users should be removed from the application. This is the final step in the Trial Close process. Information for removing users can be found in the Enterprise Manager manual.
8-4-4 Modify User Access
User access may be modified to fulfill sponsor requirements for Trial Close. Information for modifying user access can be found in the Enterprise Manager manual.
9-0 User Administration
General Information
Process ID
9-0
Process Purpose
This process outlines the steps for administering users.
Flow Diagram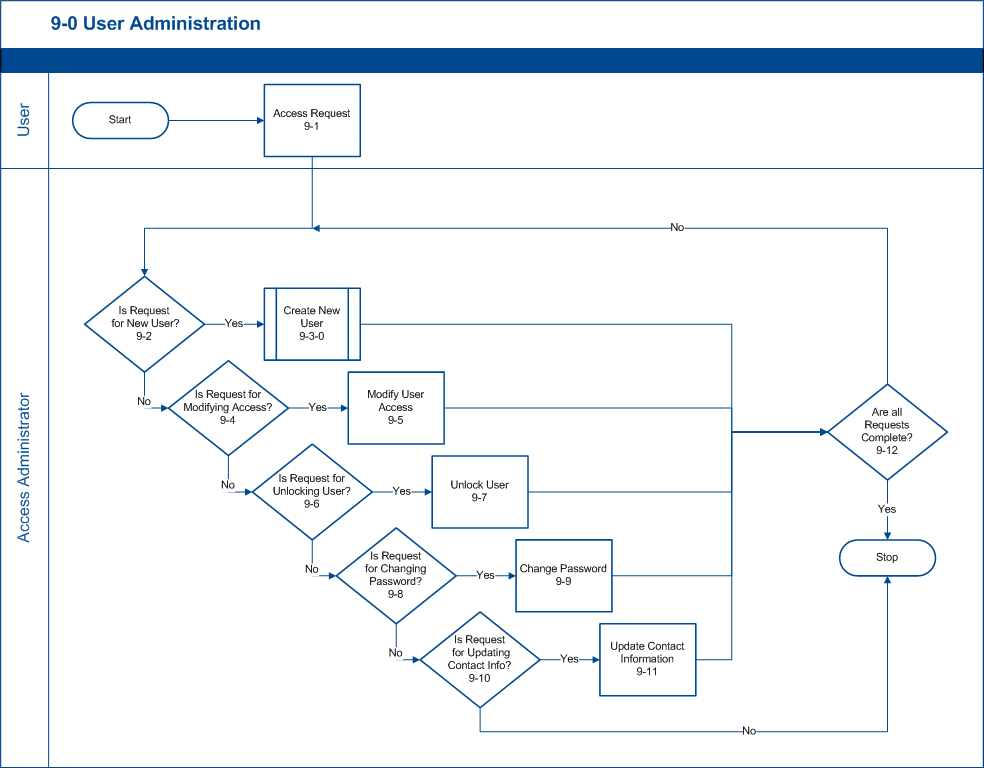
Interface Description
Entrance Criteria
A request for a new user or modification to an existing user account must be received.
Inputs
User Request
Outputs
Modified User Account
Exit Criteria
The user request has been fulfilled.
Procedural Description
Responsibilities
User requests must be fulfilled. This may include one or more of the following:
- Create New User
- Modify User Access
- Unlock User
- Change Password
- Update Contact Information
9-1 Access Request
Before user access can be assigned or modified, a request must be received by the Access Administrator (the person responsible for implementing user requests.) This request may be sent in multiple formats but should include at least the following information:
- User’s Name
- User’s Email Address
- Study/Trial
- Study Participation/Role
9-2 Is Request for New User?
Upon receipt of a request, it must be determined if the request is for a new user or an existing user. To search for an existing user, please see the Searching Users section of the Enterprise Manager Manual. If the user is not found, the request will require the creation of a user account; proceed to 9-3-0 Create New User. If the user is found, proceed to 9-4 Is Request for Modifying Access?.
9-3-0 Create New User
If the user is new to the system, a user account must be created. User accounts may be created individually or in batch. Please NOTE that user accounts are never deleted; their access is just removed. If a user has used the Fountayn Platform, then there should be an existing account. Once the request is fulfilled, proceed to 9-12 Are all Requests Complete?.
9-4 Is Request for Modifying Access?
Review the request to determine if it requires the modification of the user’s access (role to a study). If the request is for modifying the user’s access, proceed to 9-5 Modify User Access. If the request does not require the modification of a user’s access, proceed to 9-6 Is Request for Unlocking User?.
9-5 Modify User Access
To modify a user’s access, please see the Editing User Access section of the Enterprise Manager Manual. Once the request is fulfilled, proceed to 9-12 Are all Requests Complete?.
9-6 Is Request for Unlocking User?
Review the request to determine if it requires the unlocking of a user’s account. If the request is for unlocking a user, proceed to 9-7 Unlock User. If the request does not require unlocking a user’s account, proceed to 9-8 Is Request for Changing Password?.
9-7 Unlock User
To unlock a user, please see the Unlocking Users section of the Enterprise Manager Manual. Once the request is fulfilled, proceed to 9-12 Are all Requests Complete?.
9-8 Is Request for Changing Password?
Review the request to determine if it requires changing the password for a user’s account. If the request is for resetting a user’s password, proceed to 9-9 Change Password. If the request does not require changing a user’s password, proceed to 9-10 Is Request for Updating Contact Info?.
9-9 Change Password
To change a password, please see the Changing a User’s Password section of the Enterprise Manager Manual. Once the request is fulfilled, proceed to 9-12 Are all Requests Complete?.
9-10 Is Request for Updating Contact Info?
Review the request to determine if it requires updating a user’s contact information. If the request is for updating a user’s contact information, proceed to 9-11 Update Contact Information. If the request does not require updating a user’s contact information, proceed to 9-12 Are all Requests Complete?.
9-11 Update Contact Information
The functionality and documentation for updating a user’s contact information from within Enterprise Manager will be coming soon. For now, the user will have to update their own contact information via their User Profile, which is accessible from their desktop.
9-12 Are all Requests Complete?
Review the request to make sure all actions have been performed. If yes, the User Administration process is complete. If no, proceed to 9-2 Is Request for New User? and work through the process until all requests are completed.
9-3-0 Create New User
General Information
Process ID
9-3-0
Process Purpose
This process outlines the steps for creating a new user account.
Flow Diagram
Interface Description
Entrance Criteria
The request for a new user account must be received by the Access Administrator.
Inputs
A New User Request, No Existing User Account
Outputs
A User Account, Trial Access
Exit Criteria
A new user account has been setup and access has been assigned.
Procedural Description
Responsibilities
The User Account should be created and appropriate trial access assigned to the account.
9-3-1 Is Request for a Single User?
Determine if the request requires the setup of a single user account or multiple user accounts. If the request requires setting up a single user account, proceed to 9-3-2 Create a Single User Account. If the request requires setting up multiple user accounts, proceed to 9-3-4 Create Multiple User Accounts.
9-3-2 Create Single User Account
To create a single user account, please see the instructions on creating a single user account under the Creating New User Accounts section of the Enterprise Manager Manual. Once the account has been created, proceed to 9-3-3 Add User Access.
9-3-3 Add User Access
To add trial access to a user account, please see the Adding User Access section of the Enterprise Manager Manual. Once the trial access has been assigned, proceed to 9-3-5 Email Notification to User.
9-3-4 Create Multiple User Accounts
To create multiple user accounts at one time, please see the instructions on creating multiple user accounts under the Creating New User Accounts section of the Enterprise Manager Manual. Once the account has been created, proceed to 9-3-3 Add User Access.
9-3-5 Email Notification to User
Once the user’s access has been assigned, the user should be notified via email. This process should be done manually until it is automated within the software.
10-0 Support
General Information
Process ID
10-0
Process Purpose
This process outlines the steps for providing support to users.
Flow Diagram
Interface Description
Entrance Criteria
A user of the Fountayn Platform encounters a problem they need help with or needs more information about a certain topic.
Inputs
Problem
Outputs
Solution
Exit Criteria
The user was able to have their problem corrected or find the information they needed.
Procedural Description
Responsibilities
Support may be provided by Fountayn or by an Enterprise or CRO Connect Program partner, depending on the nature of the individual study’s contract. Support escalation policies can differ from company to company, and partner companies may escalate support to Fountayn at a certain point.
10-1 Locate Solution in Fountayn Learning Center (optional)
The Fountayn Learning Center is a large knowledge base of information, capable of providing “Zero-Level” support to eClinical end users and trial designers. Solutions to a wide variety of topics can be found there.
10-2 Was Solution Found?
If the user is not able to find the solution to their problem, they will then submit a Help Request to the relevant party.
10-3 Submit Help Request
Depending on the agreement for the particular study, the user either submits a Help Request to Fountayn or to the responsible CRO or Fountayn Partner.
10-4 Does Solution Exist in Learning Center?
If the solution to the problem exists in the Learning Center, there is no need to duplicate content. The support party sends a link of the relevant page to the end user, thus making them aware of the solution and of the Learning Center’s usefulness.
10-5 Perform Support
The support party will perform customer support according to their company’s methods and the severity of the problem.
10-6 Did Support Determine a Solution?
If support is unable to find a solution to the problem, proceed to step 10-7 Escalate Support. If the solution is found, proceed to step 10-8 Add Solution to Learning Center, if applicable. If not, proceed to step 10-9 Notify User of Solution.
10-7 Escalate Support
If a solution to the problem was not determined at the current level of support, escalate support to the next level. The exact escalation procedure will vary by company, and may involving escalating support directly to Fountayn (if Fountayn is not already performing the support).
10-8 Add Solution to Learning Center (optional)
If applicable, add a section to the Learning Center listing the problem and its solution. This may be in the form of a Frequently Asked Question, or an entirely new page.
10-9 Notify User of Solution
After the solution has been found, email and/or call the user and notify them of it.
Need more help?Fountayn
 Please visit the Fountayn Contact Information page.