Summary
This article covers various ways to customize email templates using style tags, context keys, adding company logos, and more.
Table of Contents
Customizing Email Templates
Fountayn customers can customize the email templates associated with their User Administration notifications, Randomization & Trial Supply Management (RTSM) email notifications and status email notifications. While editing the email template files is the same regardless of the email notification system, the steps necessary for file management and the features available vary from system to system. This guide presents the steps necessary to customize email templates for each email notification system.
Recommended Steps
Randomization & Trial Supply Management Email Notification System
- Visit the Randomization & Trial Supply Management templates page to become acquainted with the available email templates.
- Review how to work with template files to learn how to access, download, upload and delete the email files.
- Follow the step-by-step instructions for editing email templates.
Status Email Notification System
- Visit the Status email templates page to become acquainted with the available email templates.
- Review how to work with template files to learn how to access, download, upload and delete the email files.
- Follow the step-by-step instructions for editing email templates.
User Administration Notification System
- Visit the templates page to become acquainted with the available email templates.
- Review how to work with template files to learn how to access, download, upload and delete the email files.
- Follow the step-by-step instructions for editing email templates.
Edit Email Templates
If you only need to make small changes to the existing text within an email template, the sections for Randomization & Trial Supply Management, Status Email Notification and User Administration email templates highlight the portions that can be easily edited. This section presents the steps necessary to add new sections to an email template and to change the logo image in an email template.
Email Template Structure
All email templates are written in HTML and are comprised of different table-related tags and style tags. Opening tags are made up of two chevrons (‘<’ and ‘>’) and a label name. Closing tags are made up of two chevrons (‘<’ and ‘>’), a ‘/’ and a label name. For example, the opening and closing tags to represent a table would be <table> and </table>. This section describes the tags commonly used in email templates. It also presents each tag’s commonly used attributes. When used, these attributes are contained inside the opening tag of the element as shown in the example.
<table>
All content for email templates is contained within <table> tags. Within this table tag, you can define rows which are designated by the <tr> tag.
Common Attributes
| Name | Description | Common Value |
| border | Specifies the width of the table | 0 |
| valign | Specifies the vertical alignment of the table on the page | top |
| align | Specifies the horizontal alignment of the table on the page | center or left |
| width | Specifies the width of the table. This value can be represented by pixels or percents | 100% |
<tr>Each <tr> tag represents the start of a new row inside a table. Each row is further divided into data cells with the <td> tag.
Common Attributes
| Name | Description | Common Value |
| align | Specifies the horizontal alignment of the content in the row | right |
| valign | Specifies the vertical alignment of the content in the row | top |
<td>Each <td> tag represents a data cell within a row. The actual text displayed in the final email template is defined within opening <td> and closing </td> tags.
Common Attributes
| Name | Description | Common Value |
| colspan | Specifies the number of columns that the cell will span in the table. This attribute is not needed if the cell should span only one column | 2 |
| width | Specifies the width of the data cell. This value can be represented by pixels or percents | 100% or 50% |
For a more complete list of table tags and their available attributes, you can visit the following website, which is not associated with Fountayn in any way: http://www.w3schools.com/html/html_tables.asp
<br>
Break tags are used to indicate line breaks. There are no attributes associated with this tag, and no closing tag is needed.
<font>
All text within the opening and closing <font> tags will take on the style defined by the <font> tag’s common attributes.
Note: The default text size, face and color are 3, Times New Roman and black respectively. This tag only needs to be used when the default settings are not desired.
Common Attributes
| Name | Description | Common Value |
| size | Specifies the size of the text. This value can range from 1 to 7 | 1 |
| face | Specifies the font face style | Arial |
| color | Specifies the color of the text | No common value |
Style Tags Different style tags can be used around text to change its appearance.
Common Style Tags
| Style | Description | Example |
| <b> | Creates bold text | <b>Bold Text</b> |
| <i> | Creates italicized text | <i>Italicized Text</i> |
| <u> | Creates underlined text | <u>Underlined Text</u> |
Context Keys
Context Keys are used to reference information related to a study. These keys always begin with a dollar sign ($) and are case-sensitive. A list of context keys for the Randomization & Trial Supply Management, PMS and User Administration email templates are available on each corresponding email template page and should be referenced when trying to understand the uses for each context key.
| Name | Description | Common Value |
| $ | Designates the use of a context key | $userName |
| $!{contextKey} | Designates that an empty, blank value should be used if the context key has no value | $!{faxNumber} |
All context keys in the email templates need to be copied exactly to prevent errors related to accessing the information from the server. Example
In the following Randomization & Trial Supply Management product example, a table is defined with two rows. The table’s border width is set to zero to prevent a border from showing around the table. Its width is set to 100% so that it spans the entire width of the email. The first row in the table contains two columns with the content, “Study:” and “$!{applicationName},” respectively. The second row contains a single data cell that spans two rows since the attribute ‘colspan’ is set to 2. The data cell contains the statement, “Requisition Number (Customer Ref(s)):” followed by the context key, $shipment.getDisplayID(). The entire line of text is also bold due to the opening and closing <b> tags.

Complete Site Form in Trial Manager
Email templates often pull information from the Site form within the Trial Manager. This information is accessible through predefined context keys as explained below. To assure that all emails are displayed properly, it is recommended that you complete the Site form.
- In the Trial Manager, select the site that will use the email template.
- Complete the Site form.

- Click the ‘Save Form’ button. The following is a list of fields from the Site Form and their corresponding context keys that can be used in certain email templates.
- Site Name — $siteName
- Street Address Line 1 — $addressLine1
- Street Address Line 2 — $addressLine2
- Suite/Office/Floor — $addressLine3
- City — $addressLine4
- State/Province — $addressLine4
- Postal Code — $addressLine4
- Country — $addressLine4
- Phone Number — $phoneNumber
- Fax Number — $!{faxNumber}
Note: As shown above, $addressLine4 corresponds to information from several fields.
Add a Company Logo to the Template
By default, all email templates use the Fountayn logo. This section describes the steps necessary to replace this logo.
- In the File Manager, upload the new logo image with the permission for the file set to ‘Public.’

- Click the ‘Save’ button.
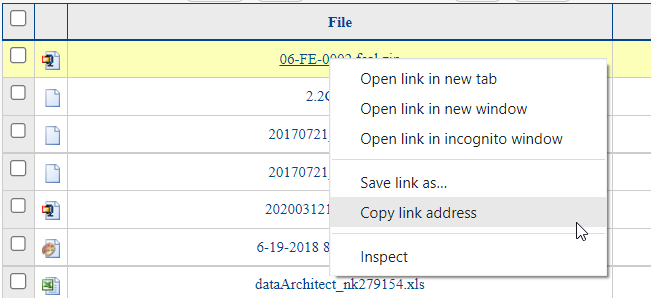
- Copy the complete link address for the image. Depending on your browser, this step can be
performed in different ways. For all browsers, right click the link to the image in the File Manager and do one of the following:
- If using Google Chrome, select ‘Copy Link Address.’
- If using Firefox, select ‘Copy Link Location.’
- If using Microsoft Edge, select ‘Copy shortcut.’
- Load the email template in a text editor such as Textpad or Notepad++.
- Locate the <img> tag near the top of the file that looks like the following:
<img src='$logoImage'>
If the above image tag does not exist, add it to the email template as a new row as described in the adding rows section.
- In place of $logoImage, paste the link address of the logo image file that you copied in step 2.
<img src="https://your.image.link.here">
- Save the file and upload the template as described in the section on uploading templates for URTSM and PMS or User Administration emails.
Add New Rows to the Template
Each email template has its own list of acceptable, predefined context keys. Refer to these lists on the Randomization & Trial Supply Management, PMS and User Administration email template pages. Additional context keys can also be defined for Randomization & Trail Supply Management-related email templates.
A good practice when adding new rows is to copy an existing row that resembles what you want to add. - After loading the email template in a text editor such as Textpad or Notepad++, locate the place where you would like to add a new row to the table.
Example: For the Activation template in the Randomization & Trial Supply Management product, we could add the name of the person who performed the randomization. A good location for this could be after the Randomization Date.
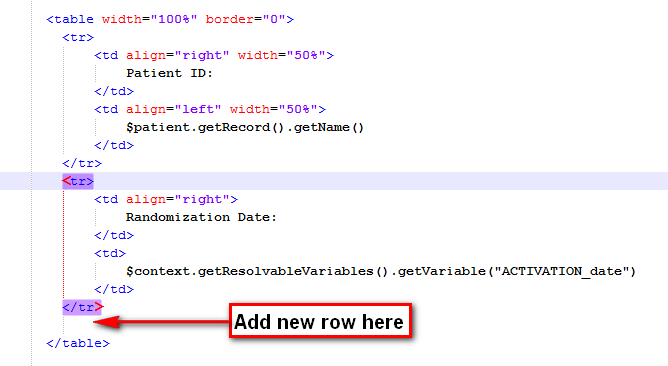
- Enter the following code to add a new, blank row to an existing table.
<tr></tr>
- Within the opening and closing row tags, add two sets of <td> tags to make two data cells within the row. In the following example, the ‘align’ attribute is used to right-align the text within the data cell. At this point all of the formatting is complete. However, this new portion of the email template will appear blank until we add content within the <td> tags.
<tr>
<td align="right"></td><td></td>
</tr>
- Enter text and context keys within the <td> tags. This text will be visible in the email.
<tr>
    <td align= “right”>
       Randomization Performed by:
    </td>
    <td>
        $context.getResolvableVariables().getVariable("ACTIVATION_fullName")
    </td>
</tr>
- When all the additions have been made, save the file. The new template is ready to be uploaded.
Update Email Preferred Language
On the Manage Email Templates screen, you can define language specific templates and send access emails using your preferred language. In the Enterprise Manager, perform the following steps:
- Right click the Enterprise level entry in the hierarchy
- Select the Manage Email Templates option

- Select the Add Customized Email Template tab at the top of the Email Templates form
- Once in the Add Customized Email Template form, add your Subject, select Type and then select the preferred Language from the drop-down menu.

- Browse to select your File location.
- Click the Save button.
Need more help?
 Please visit the Fountayn Contact Information page.