Summary
This article covers the steps necessary to create remaining forms in the DataArchitect file to finish creating your visit.
Table of Contents
- Concepts Covered
- Step 1: Create Forms You Will be Using
- Step 2: Create the Next Visit
- Step 3: Create the Rest of the Visits
- Step 4: Create Physical Exam Questions
- Step 5: Create Vital Signs Questions
- Step 6: Create ECG Questions
- Step 7: Add the new Questions to the Question Layout
- Step 8: Add the new Questions to the Display
- In Conclusion
One of the most powerful features of the clinical research platform is the ability to reuse forms and questions. This enables the Trial Designer to create a form (or entire visit) once, and then have that form appear in many places within the casebook for the patient. For example, instead of manually creating a new Vital Signs form to be used at each visit, it only has to be created once. After completion of this tutorial, you will understand how to create forms that occur across a number of visits within the study.
Concepts Covered
This tutorial covers the following topics:
- Creating Forms
- Creating Questions
- Reusing Forms and Questions across Multiple Visits
This tutorial assumes you are starting from where you left off in Part 1. If you skipped Part 1, please download this DataArchitect file: DataArchitect Template
Step 1: Create Forms You Will be Using
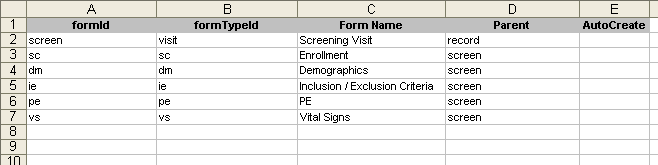
You will begin by adding two forms, Physical Exam and Vital Signs, to the Screening Visit you already have. Don’t worry about adding questions just yet. You can place these forms directly below the forms you already have.
First, go to the FormsTypes worksheet and enter formTypeIds of pe and vs, and name them PE and Vital Signs. Next, go to the Forms Template worksheet and enter the following:
| formId | formTypeId | Form Name | Parent |
|---|---|---|---|
| pe | pe | PE | screen |
| vs | vs | Vital Signs | screen |
Next, create the ECG form, which will be used at Visit 1 and later. Go to the FormTypes worksheet and create a new formTypeId of eg, with name ECG. Don’t worry about placing it in the Forms Template yet, it will not go under the Screening visit.

Step 2: Create The Next Visit
Now you will add the next visit in our tutorial study, Visit 1. Visit 1 will contain the Vital Signs and Physical Exam forms from the Screening visit, as well as the ECG form.
You created the form type for visit container forms in Part 1 of this tutorial, therefore no new information needs to be added to the FormTypes worksheet. All that is needed in order to create Visit 1 is to add the form to the Forms Template worksheet. It will be the same as the Screening visit, except where before the formId was screen and the Form Name was Screening Visit, this time you will use v1 for the formId and Visit 1 for the name. The Parent form for Visit 1 will be record, so it will be at the same level as the Screening visit.
Most visits will have record as their parent. An exception would be if your study is organized into cycles or periods first, and then individual visits.
After the Visit 1 container form is added to the Forms Template, you can add the PE, Vital Signs, and ECG forms underneath it. These three forms will be occuring at multiple visits, so you will need to give them unique formIds. Since this is Visit 1, you can add a V1 to the end. Don’t forget to make the Parent be v1, which is the Visit 1 container form’s formId (not formTypeId). When you’re done, the Forms Template should have four new rows that look like this.
| formId | formTypeId | Form Name | Parent |
|---|---|---|---|
| peV1 | pe | PE | v1 |
| vsV1 | vs | Vital Signs | v1 |
| egV1 | eg | ECG | v1 |
Remember, the PE, Vital Signs, and ECG forms have all been defined in the FormTypes worksheet already. You don't need to define them again, just add them to the appropriate place in the Forms Template worksheet. 

Step 3: Create The Rest of the Visits
This tutorial study will have three visits, not including the Screening visit. The process for creating the next two visits is the same as creating the first visit. You do not need to create any new form types on the FormTypes worksheet, just add the forms to the Forms Template. Add the PE, Vital Signs, and ECG forms to each of the visits as well.
Make sure to order the forms in the Forms Template as you want them to appear in the application. For each of the PE, Vital Signs, and ECG forms, add an identifier to the formId to indicate what visit they belong to (V1, V2, V3).


Step 4: Create Physical Exam Questions
Now that the basic form structure is in place for the Tutorial Study, you can create some questions for the new forms you added. You will work on the Physical Exam form first.
When you chose to create questions is up to you. You can wait until all of the forms have been added, like in this tutorial, or you can create questions for each form as you add the forms for the first time.
The Physical Exam form introduces a new Display Type: MultiLineText. This Display Type is what it seems; a text box allowing the user to enter data over several lines, instead of all on one line. You should always use the String Data Type to go along with MultiLineText.
You will only enter a few questions for our Physical Exam form, in a real study there would most likely be many more systems tested. Your questions should be entered as appears in the following screenshot.

Step 5: Create Vital Signs Questions
The Vital Signs form is next on our list. It will contain the visit date question, as well as a few questions capturing important patient information. Introduced with the Vital Sign form is a new Data Type: Integer. Integer questions can only be entered and stored as whole numbers, no text or decimals are allowed. The Display Type for Integer questions is typically Text, but sometimes others, such as RadioCheckbox, can be used.
Integer questions require an Invalid Format Alert to be specified in order to work properly, similar to Date questions. It is a good idea to keep this warning consistent across all questions of a certain type in your study.The Vital Signs question should be entered as appears in the following screenshot.

Note: Look how the units or format for each question are specified in parenthesis after the question text. In any situation where you want the end user to enter data in a certain way, it is a good idea to include this "helper text" after the actual question text. More complicated instructions can be included in the text specified on the Display worksheet.Step 6: Create ECG Questions
The last of the forms in this tutorial is the ECG form. It will contain typical questions that would be collected after an ECG is performed, such as heart rate and different interval lengths. A new Data Type will be introduced with this form as well, the Float Data Type. A Float question is similar to an integer, except decimal digits are allowed. The Display Type for Float questions is almost always Text, and like Date and Integer questions, an appropriate Invalid Format Alert must be used.
The ECG questions should be entered as appears in the following screenshot.

Step 7: Add the new Questions to the Question Layout
Now that all of our questions have been created, you can add them to the Question Layout. Questions will have to be added to each unique formId. For example, there is a Vital Signs form at every visit, so there will be four listings of Vital Signs questions in the Question Layout. You can keep the questionId the same as the questionTypeId in all instances, for this tutorial.
It is a best practice to keep the order of the Question Layout worksheet in the same order as the Forms Template and Question Types worksheet. Questions should be grouped by formId.The fastest way to build the Question Layout worksheet is to make heavy use of the copy-paste feature of Excel. You can copy formIds from the Forms Template worksheet, and questionTypeIds and questionsIds from the Question Types worksheet (use the same value for both).When you are done adding the questions to the Question Layout worksheet, it should look like the two screenshots below


Step 8: Add the new Questions to the Display
Now that the questions have been created and added to the appropriate forms on the Question Layout worksheet, the last step is to add them to the Display worksheet. Unlike the Question Layout, you only need to add each form’s question once. You will be dealing with the formTypeId of each form here, not formIds.
At the beginning of each form, include a header line indicating the name of the form. Be sure to include horizontal rules (denoted by <hr>) before and after the title.
Remember, copy-paste is your friend!When you are done, your Display worksheet should match the screenshot below.

In Conclusion
After completing this tutorial, you should feel comfortable in the following topics:
- Creating Forms
- Creating Questions
- Reusing Forms and Questions across Multiple Visits
Now that you’re armed with this information, we suggest you take the next tutorial: Dynamic Forms.
Need more help?
 Please visit the Fountayn Contact Information page.