Summary
This article shows you how to create dynamic forms to your study and make them available for the user.
Table of Contents
- Concepts Covered
- Step 1: Create an Adverse Events Form Summary
- Step 2: Create an Adverse Events Dynamic Form
- Step 3: Create Adverse Events Questions
- Step 4: Create a Concomitant Medications Form Summary
- Step 5: Create a Concomitant Medications Dynamic Form
- Step 6: Create Concomitant Medications Questions
- Step 7: Add Questions to the Question Layout
- Step 8: Add Questions to the Display
- In Conclusion
Another powerful feature of the Fountayn clinical research platform is the ability to define a form once, and then let the user create as many of those forms as they need. This is especially useful for items like Medical History, Adverse Events, and Concomitant Medications. Some times these forms are part of a visit, other times they stand alone in the form structure. After completing this tutorial, you will know how to create dynamic forms to your study and make them available for the user.
Concepts Covered
This tutorial covers the following topics:
- Creating Dynamic Form Summaries
- Creating Dynamic Forms
- Creating Question and Form
Step 1: Create an Adverse Events Form Summary
Note: Dynamic forms must have a parent or summary form that they are generated at. You can either build a new summary form as in this tutorial, or use an existing form. For example, you could create a "Physical Exam Other Test" dynamic form that would be generated on the Physical Exam form. Either way, the process to add dynamic forms to your study is the same.
First, you will need to build the summary form for the Adverse Events. The process for this is very similar to creating a normal form. To begin, go to the FormTypes worksheet and add a new formTypeId, “aesum”, with a Form Type Name of Adverse Events Summary. Next, type “ae” in the Allowed Dynamic Forms column. This will be the formTypeId of the Adverse Events form you create in the next step.
Note: If you do not specify an allowed dynamic form, there will be no link on the page for the user to create one.
After you have created the summary form, be sure to add it to the Forms Template worksheet. As is typical with Adverse Events, you will add it to the bottom of the template, and its Parent form will be “record”, meaning it is at the highest possible level in the form structure. Go ahead and keep the formId the same as the formTypeId; there will only be one Adverse Events Summary form.

Step 2: Create an Adverse Events Dynamic Form
Now that the summary form has been created, you can create the Adverse Events dynamic form. This will be the form that is generated by the user each time they need to enter a new Adverse Event.
First, go to the FormTypes worksheet and create a new formTypeId of “ae”, with a name of Adverse Event. Now, you will make use of the “Rename To” column. Change this column to be as follows:
- ‘ ‘AE: ‘ + aeterm
Note: Make sure to include both of the apostrophes before "AE".
When dynamic forms are created, they all have the same name with an increasing number appended to the end. For example, AE 1, AE 2, AE 3, and so on. In this tutorial, the forms will be renamed to “AE: name of the adverse event”, like “AE: Headache” or “AE: Fever”. The ‘AE: ‘ part of the Rename To expression is simply plain text, while the + aeterm portion specifies the questionId that the form will be renamed from.
Note: The "Rename To" field is very useful for dynamic forms, as it allows for the forms to have more descriptive names in the form tree. You are free to use any of available questions on that form in order to rename a dynamic form, but keep in mind how long the form name could eventually become.
Now that the Adverse Event dynamic form has been created, don’t forget to add it to the Forms Template. Place it underneath the summary form, but leave the Parent blank.
Note: If the first dynamic form will be present when the casebook is created, it needs to be associated with a parent.

 Step 3: Create Adverse Events Questions
No dynamic form is very useful without questions, so you will create some of those now. You will only create a few questions for the purposes of this tutorial, an Adverse Event form in a real-world study would typically have more. You will also create one question for the Adverse Events Summary form, a simple “Did the patient have any Adverse Events” check.
Note: As you are creating new questions, make use of Excel's autocomplete feature to speed the process. For example, if you type a "D" into the Data Type column, the word "Date" should appear and you can press the enter key without having to type out the whole word. This can work for any fields where the same thing is entered repeatedly. Of course, copy-paste can also be an effective tool.
For right now, don’t worry about placing any questions on the Question Layout or Display worksheets. You will just be adding them to the Question Types worksheet. For the purposes of this tutorial, you can copy the information for these questions from the screenshot below.
Step 4: Create a Concomitant Medications Form Summary
Next, you can create the Concomitant Medications form summary. Creating the Con Meds forms will follow the exact same process as the Adverse Events.
To begin, go to the FormTypes worksheet and add a new formTypeId, “cmsum”, with a Form Type Name of Concomitant Medications Summary. Next, type “cm” in the Allowed Dynamic Forms column. This will be the formTypeId of the Concomitant Medications form you create in the next step.
After you have created the summary form, be sure to add it to the Forms Template worksheet. Place it underneath the Adverse Event dynamic form in the list, and its Parent form will be “record”. You can keep the formId the same as the formTypeId.

Step 5: Create a Concomitant Medications Dynamic Form
Just like in the last step, you will be following the same process here as you did with Adverse Events.
First, go to the FormTypes worksheet and create a new formTypeId of “cm”, with a name of Concomitant Medication. This form will also use the “Rename To” field, in order to make it easier for the user to find a particular medication’s form. Change that column to be the following:
- ‘ ‘CM: ‘ + cmtrt
Note: Make sure to include both of the apostrophes before "CM".Don’t forget to add the Concomitant Mediation dynamic form to the Forms Template. Place it underneath the Concomitant Mediations summary form, and be sure to leave the Parent blank, as you did with the Adverse Event dynamic form.
Note: If the first dynamic form will be present when the casebook is created, it needs to be associated with a parent!

 Step 6: Create Concomitant Medications Questions
Following the pattern of this tutorial, now you will create a set of questions to be used on the Concomitant Medications forms. Just like Adverse Events, the Concomitant Medications Summary form will be given a “Has the subject taken any medications” check, and you will add a few simple questions to the Concomitant Medication dynamic form.
Again, don’t worry about placing any questions on the Question Layout or Display worksheets. You will just be adding them to the Question Types worksheet in this step. For the purposes of this tutorial, you can copy the information for these questions from the screenshot below.
Step 7: Add Questions to the Question Layout
Next, you can add the questions you have created for Adverse Events and Concomitant Medications forms to the Question Layout. Don’t forget that the aeyesno and cmyesno questions go on their respective summary forms, and be sure to keep the questions and forms in order as they appear in the application.
Note: Although dynamic forms can be generated by the user as many times as they wish, their questions only need to be defined once in the Question Layout worksheet.
When you are finished adding the questions, your Question Layout worksheet should match the one in the screenshot below.
Step 8: Add Questions to the Display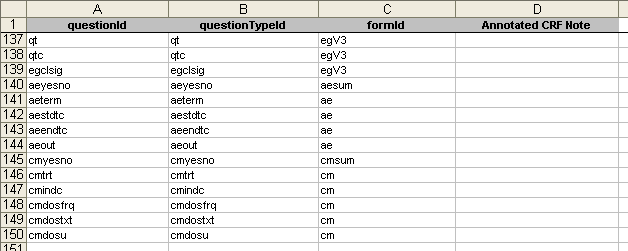
As with any form having questions on it, these summary and dynamic forms will need to be configured in the Display worksheet. The best method is to take the list of formTypeIds and questionIds directly from the Question Layout directly.
Note: Don't forget to include a header for all four forms. Specify the header in the Group Title field for the first question on each form.
When you are finished, your Display worksheet should match the one in the screenshot below.
In Conclusion
After completing this tutorial, you should feel comfortable in the following topics:
- Creating Dynamic Form Summaries
- Creating Dynamic Forms
- Creating Question and Form
Now that you’re armed with this information, we suggest you take the next tutorial: Partial Dates.
Need more help?
 Please visit the Fountayn Contact Information page.