Summary
This article shows you how to build, upload, delete, and disable new sites in trial manager.
Table of Contents
- Concepts Covered
- Step 1: Manually Create a Parent Site
- Step 2: Manually Create Subsequent Children Sites
- Step 3: Uploading a Network of Sites
- Step 4: Renaming Sites in Trial Manager
- Step 5: Deleting Sites from Trial Manager
- Step 6: Disabling Sites from Enterprise Manager
- In Conclusion
All studies are set up in the eClinical Trial Manager ™ and within Trial Manager you have the ability to manage your site set up. The site network is managed independently on each cluster. The All Sites link is initially created when the trial is setup – one link/tool on each cluster.
This initial tool is meant as a starting point for building the appropriate site network for Design, Test, Approve and Production use. Trial Manager provides the ability to build a comprehensive site network as well as multiple independent tools.
In addition, Enterprise Manager allows the ability to activate and de-activate sites with the click of a button. This is useful when sites are no longer in use for the study. In addition it helps prevent users from accidentally gaining access to these sites.
Concepts Covered
This tutorial covers the following topics:
- Building New Sites in Trial Manager
- Uploading New Sites to Trial Manager
- Deleting Sites from Trial Manager
- Disabling Sites from Enterprise Manager
Step 1: Manually Create a Parent Site
Within Trial Manager you have the ability to add a parent site to the appropriate environment (Design, Test, Approve and Production). The set up process is the same in all four instances except each is completed in the respective environment.
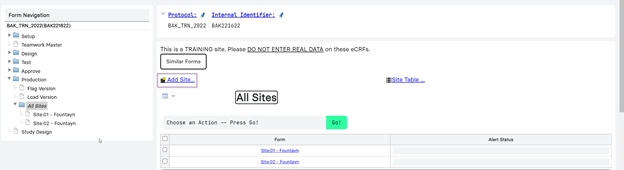
In the form links tree click on the appropriate environment you wish to set up a Parent Site. Click on the ‘Add Site’ link which will populate a dynamically inserted form. You will be prompted to fill in the following information: Site Name, Parent Site classification, Role Set, Description and Site Code used in the file naming convention if applicable. Since this is the Parent site of the cluster be sure to choose ‘None’ for Parent Site on the form. Once all information is completed click on Save and your Tool ID will automatically populate.
Note: Classification is used to determine if this is a live site in the environment or if it is a training site.
Step 2: Manually Create Subsequent Children Sites
Now that you have created your Parent Site you can add subsequent children sites to the parent site. Click on the Parent Site you have just created in the form links tree and above the information you entered for the Parent Site you will see another ‘Add Site’ link. Click on this link to open a dynamic form for your first child site.
You will be prompted to fill in the following information: Site Name, Parent Site, Role Set, Description and Site Code used in the file naming convention if applicable. Since this is a child site be sure to select the appropriate Parent Site for your new site. Once you have filled out all of the information click on Save and your Tool ID will automatically populate.
Note: If you have created separate role sets for individual children sites, be sure to select the correct Role Set when setting up your site.Repeat this process for each subsequent Child Site that will be associated with the Parent Site listed.
Step 3: Uploading a Network of Sites
In addition to manually adding sites you have the ability to upload a network of sites to your study in Trial Manager.
Go to the Form Summary for your trial and click on the environment in which you are uploading sites for (Design, Test, Approve or Production). Click the link in the ‘Please click here to download a template file.’ and an Excel template will open in a separate browser. Complete the following fields for the site network: Parent Site Name, Site Name, Classification, Role Set, Description and Site Code. Save the file to your computer.
Click the BROWSE button for the Sites CSV File: field, select the file saved in the previous step and click the IMPORT button. The site network will automatically be created for the environment you chose.
Please repeat all steps as necessary for the other environments within Trial Manager.
Step 4: Renaming Sites in Trial Manager
If a site needs to be renamed in Trial Manager you need to go into the site, update the site name and click on Save. You will be brought back to the form to provide a Reason for Change and once a reason has been entered you can click on Save again to save the final changes.
Step 5: Deleting Sites from Trial Manager
You do have the ability to delete a site from Trial Manager if it was entered in error. To delete a site in Trial Manager complete the following steps.
Select the appropriate site by clicking in the box next to the site. In the ‘Choose an Action Press Go’ Menu select ‘Delete Checked’ and click on ‘Go’. You will then be prompted to provide a reason for deletion. Upon providing that reason click on ‘Save’ and your site will no longer show as an active site. By clicking on deleted forms you will be able to see all sites which have been deleted.
Note: Deleting a site from Trial Manager will NOT remove it from Enterprise Manager. Please see Step 6 below for steps to prevent users from being set up to deleted sites.
Even if the site is deleted in Trial Manager the site is technically still present. It is recommended when deleting a site, change the parent in Trial Manager (move outside of the All Site Site) and this action removes it from the network.
Step 6: Disabling Sites from Enterprise Manager
All sites upon set up in Trial Manager will show as active sites in Enterprise Manager.
In the event that a site is deleted from Trial Manager it will not be removed from Enterprise Manager. The deleted site will still show as an active site in Enterprise Manager and users can still be assigned to the site. To help prevent users from being assigned to deleted sites in Trial Manager you have the ability to de-activate sites in Enterprise Manager. In the Status Column click on the Green Icon which will turn to Red. Once the status icon show red you will know that the site has been de-activated.
Note: Even though the site is de-activated, users can still be assigned to the site. Be careful when assigning users to sites so these de-activated sites are not used in error. If a user is assigned to a site that has been de-activated, the user will NOT see this site when logged into eClinical and will have no ability to access the site. In Conclusion
After completing this tutorial, you should be capable of performing the following:
- Building New Sites in Trial Manager
- Uploading New Sites to Trial Manager
- Deleting Sites from Trial Manager
- Disabling Sites from Enterprise Manager
Need more help?
 Please visit the Fountayn Contact Information page.